
Assassin's Creed Tweak Guide
[Page 6] In-Game Settings (Pt.2)
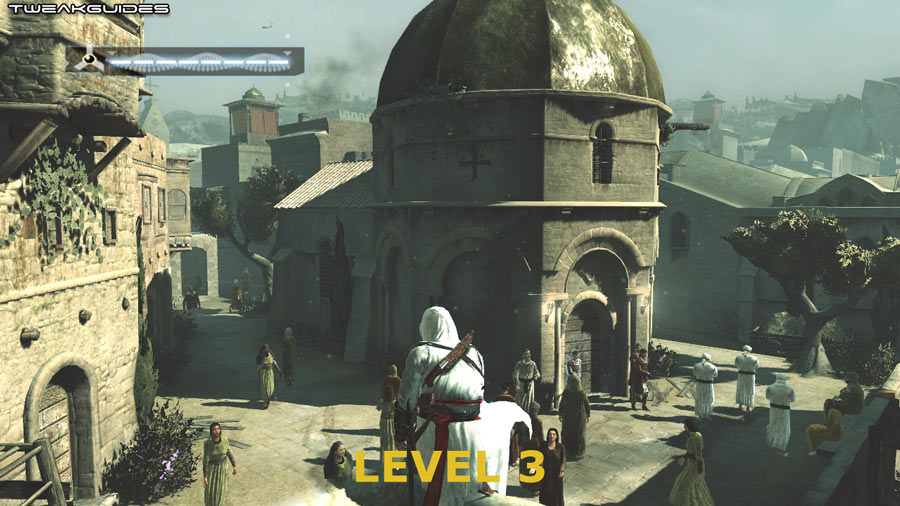
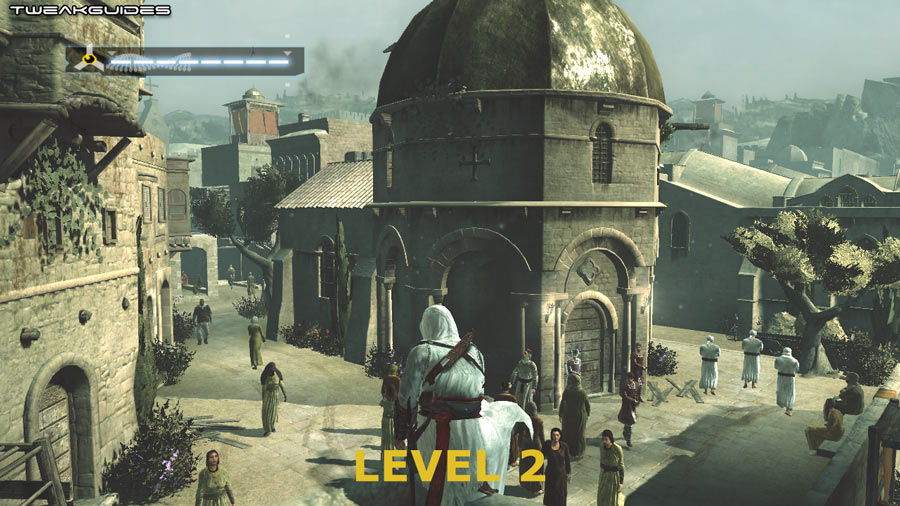
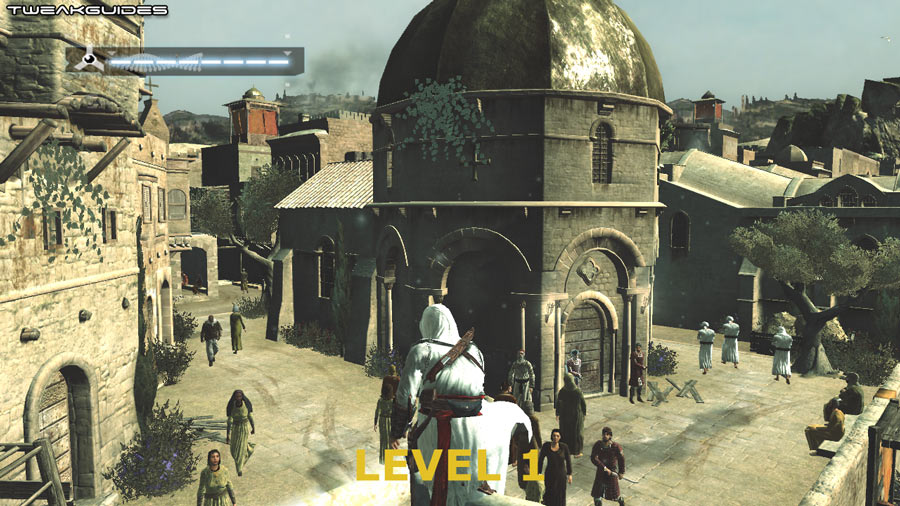
Shadows: This setting controls the quantity and draw distance, not the quality of shadows in the game - for the setting which actually affects overall shadow quality, see the Graphic Quality setting on the previous page. Note that if Graphic Quality is set to 1, all shadows are disabled, so changing this setting won't have much impact. When this option is set to 3, all shadows are shown; when set to 2, most shadows up to around middle distance are much lighter, and all shadows at longer distance are removed; when set to 1, all but fixed shadows are completely removed, including cloud shadows. A screenshot comparison is provided above, demonstrating the impact. By lowering or removing shadows in this way you can gain a great deal of performance, particularly in crowded scenes, but this obviously comes at the cost of realism and atmosphere. Note that shadow quality will differ between DX9 and DX10 mode - see the DX9 vs. DX10 section on the next page.
Multisampling: This setting controls the level of Multisampling, which is a form of Antialiasing (AA), an effect designed to reduce the jagged or 'stair-step' edges on objects in the game world. At Level 1 there is no AA applied, which provides the best performance but the most jaggies; At Level 2 some AA is applied, it looks most likely to be 2x AA - this smooths out many jagged lines to a degree and reduces the 'sparkle' effect of distant jaggies; at Level 3 it appears 4x AA is being applied, which greatly reduces/removes jaggedness from the game, at the cost of a noticeable hit in performance. An animated screenshot comparison of the general impact of the three levels of Multisampling is shown in this close-up portion of the game screen: AC_Multi.gif (448KB) - note in particular the obvious impact on the roofline at the top left.
Importantly, it seems that at higher resolutions, typically above 1600x, Assassin's Creed automatically disables access to Multisampling (i.e. it is fixed at 1 on the slider and greyed out, which equals no AA). I suspect this is because the combination of a high resolution plus Multisampling AA would require a great deal of Video RAM, which in turn could cause a great many problems on most systems, so it's been disabled. You have several options if Multisampling is disabled for you:
Whatever you do, don't try to force Antialiasing via your graphics card's control panel, as aside from not working, forcing any graphics options on Assassin's Creed via the graphics control panel can result in glitches and performance issues in the game.
PostFX: This setting controls certain post-processing special effects applied in Assassin's Creed. Setting this option to Off will improve performance, but it does not disable special effects like Bloom or Depth of Field; however it does noticeably reduce the intensity of Bloom lighting, and removes motion blur. In general the difference is not always very noticeable, however to see it more clearly, click this animated comparison: AC_PostFX.gif (301KB) - note the change in intensity of bloom in the sky in particular. You might wish to disable PostFX if you find the motion blur during horse riding annoying, or want to dim down the overall Bloom effect of lighting for example. Note that if the Graphic Quality setting (see previous page) is set to 1, PostFX is not accessible.
Audio
SFX Volume, Music Volume, Voice Volume: These sliders control the volume of the overall game world and special effects; the music volume; and the voice volumes respectively. They have no impact on performance, so set to suit your taste
If you are having audio problems in Assassin's Creed, particularly with audio glitches or missing sound, this is probably due to the game's use of EAX/DirectSound. The use of EAX can cause problems, particularly on sound cards which provide minimal EAX support, such as onboard audio. You can try one or all of the following to see if it helps (try them in the order shown):
1. Make absolutely certain you have the latest audio drivers for your sound device, and they are cleanly installed - see the Driver Installation chapter of the TweakGuides Tweaking Companion for links and details.
2. Make sure to disable any additional EAX or CMSS effects in your sound card's control panel.
3. If running Windows XP go to the Windows Control Panel> Sounds and Audio Devices> Audio> Advanced> Performance tab and move the 'Hardware Acceleration' slider to the first notch from the far left (i.e. Basic Acceleration).
4. Edit your DARE.ini file to reduce or increase the value of the NB_AUDIBLE_VOICES variable; also try setting DISABLE_OPTIMISATION to =TRUE - see the Advanced Tweaking section for more details of these.
5. Go to your \Program Files\Ubisoft\Assassin's Creed directory and backup the eax.dll file there, then replace it with this one: eax.dll.
In the end however, if the steps above don't work, then it's likely you will either have to wait for newer audio drivers from your sound device manufacturer, or a patch from Ubisoft to fix this aspect of the game.
Gameplay
Vibration: Unless you have connected a controller which is capable of vibrating to your system, this option will not be available. If available you can set it to On or Off based on whether you want the controller to vibrate.
Blood: If set to On, allows the appearance of blood in the game, such as when slashing an opponent with your sword. If set to Off, all blood is removed. Has no significant impact on performance, set to suit your taste.
High Profile Toggle: If set to On, whenever you press your High Profile button (e.g. the right mouse button on a keyboard/mouse setup), it will remain enabled until you click it again. If set to Off, High Profile mode will only be in effect as long as you are actually holding down the relevant button. Set to suit your taste, has no performance impact.
Target Lock: If set to On, Target Lock will only remain in effect as long as you're holding down your Target Lock button (e.g. the F key on a keyboard/mouse setup). If set to Off, Target Lock will remain active until you press the Target Lock button again. Again, no performance impact so set to suit your taste.
Crowd Density: This setting controls the maximum number of NPCs (non-player character) visible at any one time. There are three levels: Min, Med and Max, and the lower the setting, the potentially higher your performance will be. At the Minimum setting, only a total of 80 NPCs can exist at the same time; at the Medium setting 90 NPCs are allowed at most; and at the Maximum setting up to 105 NPCs are possible at the same time. In practice changing this setting won't greatly affect the number of people you see on the streets of most cities, because there will probably only be around 20-30 people visible at any one time. However you should notice a difference in larger outdoor areas or when vieiwng the city from above for example. Note that the Level of Detail setting (see previous page) will have a greater impact on how many NPCs you can see. Note further that you can manually adjust the maximum number of NPCs by changing the MaxNumNPCs .ini variable as covered in the Advanced Tweaking section.
HUD Elements
These settings control which aspects of your Heads Up Display (HUD) are shown on screen. In general none of them have any performance impact, so you should change whether they're displayed or not for a combination of gameplay and personal taste reasons.
Control HUD: Your Control HUD is the set of buttons and actions shown at the top right of your on-screen HUD. They constantly change depending on whether you're in Low or High Profile mode, as well as in various circumstances. Typically you can turn this element off once you get the hang of how to use the various controls in different situations.
Weapon Icon: Your Weapon Icon is displayed in the lower left corner of the HUD, and shows your currently equipped weapon, as well as available weapons when you press a numeric key (1 - 4). After a while of playing you shouldn't need this item displayed.
Sync Bar: The Sync Bar is the long thin bar shown at the top left of the HUD, and displays your current Sync Status (basically your Health), along with the Social Status/Soldier Awareness Indicator at the far left end of the bar. Generally it is best to keep this HUD component enabled, as it constantly provides valuable information on how vulnerable you might be to attack.
GPS System: The GPS System is the small map shown in the bottom right corner of the HUD, and provides markers which show your currently available objectives as well as other game world features. You can view a larger map at any time by pressing the TAB key by default. This element can make navigating the game world and finding objectives much quicker, but this also makes the game easier in some ways.
Since Assassin's Creed doesn't have a difficulty setting of any kind, by enabling or disabling certain HUD elements you can in effect alter the difficulty of the game. For example if you disable the Sync Bar and/or the GPS system HUD elements in particular, you will make the game much more challenging and immersive - you will instead have to pay much more attention to your environment, interact more, and use things like Eagle View and the full map to find objectives. Furthermore, given a large portion of the screen is already taken up by black bars on most displays, having the screen further obscured by HUD elements is not desirable, so disabling as many as you can helps you see more of the visuals.
Camera
These settings control the way the control camera responds to movements. None of them have any performance impact so set to suit your taste.
Invert X Look: If set to On, this option means moving your mouse left will make your character look right, and vice versa.
Invert Y Look: If set to On, pushing your mouse forward will make your character look down, and pulling your mouse back will make him look up
Look X,Y Sensitivity: These settings control how sensitive the camera movements will be to your mouse movements. The X Sensitivity controls the speed with which the camera moves left to right; the Y Sensitivity controls the speed for up and down camera movements.
Importantly, if you are experiencing 'mouse lag' at any time, namely the feeling that your mouse is laggy or less responsive in the game, then you will need to ensure that your Frames Per Second (FPS) are sufficiently high. Download and run the FRAPS utility in the background to measure your FPS (note that FRAPS may have some glitches in Assassin's Creed), and any time you get around 20FPS or less, it is likely you will experience an increase in mouse/control lag. You will have to change your settings to increase your average framerate, particularly during combat and in heavy crowd scenes. You can also try changing your 'Maximum Pre-Rendered Frames' option available in the 174 or newer Nvidia Forceware - see this page of the Nvidia Forceware Tweak Guide; or for ATI users, change the 'Flip Queue' setting using ATI Tray Tools, as covered on this page of the ATI Catalyst Tweak Guide. A value of 2 or 1 for these settings may help reduce mouse lag, but in the end low FPS almost always results in unavoidable mouse lag.
Customize Controls
The options in this section allow you to choose how to configure your controls - set everything to suit your taste, nothing has any impact on performance. Assassin's Creed has a range of controls which appear to be quite confusing at first, but they become more intuitive to use over time.
The next page concludes the In-Game Settings section.
|
|