
Hardware Confusion 2019
[Page 12] Windows 10 Optimization
OS: Windows 10 Professional 64-bit
And now we come to the pièce de résistance-is-futile. The lynchpin of the system, the operating system, the all-important human-friendly interface between the user and the hardware. In my case, I'm using the Best operating system ever. Why did I install Windows 10, and not the still-popular Windows 7 or Linux on my new system? Linux is simple: I know virtually nothing about it yet, so I wasn't about to use an unfamiliar operating system on unfamiliar new hardware as a starting point. But there will be a time for that, later.
I installed Windows 10 despite my distaste for it because the reality is that I've spent many years accumulating experience in using Windows, and I'm loathe to throw that all away just yet. Furthermore, as of the Kaby Lake (8th Gen) Intel CPUs onwards, Intel and Microsoft dropped support for older versions of Windows. Running a recent Intel CPU on an older version of Windows means that you won't receive critical security patches, and key system drivers are only officially available for Windows 10. It's possible to get the latest CPUs to work under Windows 7 or 8, but this is not recommended, as it's a major security risk, and some devices may not work optimally or at all.
If you were to ask me which version of Windows I would prefer if I didn't have to use Windows 10, my answer might surprise you. It would be Windows 8.1, yes the same OS I've complained about in the past now seems the most reasonable compromise, because:
Sadly, as noted earlier, Windows 10 is the only sensible option if you have the latest hardware. But if you're using a system that's more than a couple of years old, Windows 8.1 is worth a try as a secure compromise between 7 and 10. I don't recommend switching to Windows 7 now, or indeed, running it beyond its end of life at the start of next year.
In any case, whether you actually like Windows 10, or like me, you're simply resigned to running it for now, below I provide a range of performance and interface tweaks that I have personally used to optimize and customize my install of Windows 10 Pro on this new system. I know I said I'd never do a Windows 10 Tweak Guide, but this part of the article effectively represents a highly abridged version of such a guide. I cover the specific drivers and Windows settings, as well as some key interface and usability tweaks, that I used to get the best results in Windows 10 on my system. Most of it is applicable to people with any kind of system, whether Intel or AMD-based, new or old.
Please note: I cannot and will not write a detailed Windows 10 Tweak Guide at any time, so this is as good as it gets. I also won't reiterate the huge amount of general info contained in the TweakGuides Tweaking Companion (TGTC) for Windows 8, that is still relevant to Windows 10. Please download a PDF copy of the TGTC from the link above; the free Regular Edition version is perfectly fine to use, you don't need to buy a Deluxe copy.
Apologies in advance for the brief and cramped format of the information below, I wanted to save space as much as possible. Again, refer to the TGTC for any details that are missing. Also note that the information below refers to the latest version of Windows 10 at the time of this writing: 1809 (Build 17763.316). If you haven't updated, now might be a good time to do a clean install of the latest build, as it seems reasonably stable. A clean install will also resolve a range of quirks. Even if you don't update to the latest build, make sure you install all available security updates.
Installation
Initial Setup: If you've built a new system then as soon as you can boot into the UEFI BIOS, there's one important change you need to implement before installing a new OS on it: setting the drive configuration correctly. In my case, the relevant drive configuration options for my M2 NVMe SSD are found under the Advanced>Onboard Devices Configuration section of the BIOS where I set the drive to PCIE, not SATA or AHCI. If you're not using the SATA controllers, these can also be disabled; I needed to use one for my optical drive. Configuring the BIOS correctly and disabling unused devices prior to the installation of Windows is strongly recommended; it ensures optimal performance, prevents unnecessary or undesirable drivers being installed, and importantly, prevents the need to reinstall Windows if a sub-optimal drive configuration is mistakenly used.
Backup: See the Primary Drive section of this article, as well as the Backup & Recovery chapter of the TGTC for details of the importance of backups and storage configurations. Make sure you backup properly before installing or upgrading Windows 10. I recommend the System Image functionality built into Windows. It provides a range of benefits, especially as it doubles as both a full drive image, while also allowing the image to be readily mounted and browsed for selective file viewing/restoration. Only a few months ago I did a full restore of my system using a system image to fix a major issue due to the Windows 10 1809 update.
Tip: You can do a system image backup onto a USB stick, even if Backup and Restore in Windows says 'The drive is not a valid backup location'. Open File Explorer, right-click on the USB drive and select Properties>Sharing>Advanced Sharing. Tick the 'Share this Folder' box, give it a name like Backup, and click Apply. In Backup and Restore, click 'Create a System Image', click the 'On a network location' option, click Select>Browse and select a folder on the USB drive to save the system image to, then click OK. Note: This method is best used to create a portable full system backup primarily for mounting and restoring individual files/folders; I haven't tested doing a full restore in Recovery Mode. Also, you may need to unshare the folder on the USB drive for System Image to work on other drives.
Other preparation: Download the latest driver packages for your various components, and have them handy on a USB stick or external USB drive for offline installation immediately after Windows has installed. This will prevent Windows from automatically installing what may be outdated or problematic drivers via Windows Update, or in some cases, not identifying your hardware correctly. Also, you can try the free Cloneapp utility to backup and transfer program-specific settings and customizations. I had mixed success with it, but it did save me some time.
Windows 10 Keys: To install Windows 10 on a new system, you'll need either a brand new Windows 10 key, or a valid Windows 7 or 8.1 key that is not currently in use on another system. If you're unsure, there's no harm in trying to activate using a key that may have already been used. Even if Windows 10 doesn't activate, it just places a non-genuine watermark on the bottom right of the screen, nags you every so often, and removes some personalization options, so don't panic. To purchase a new key for Windows 10, the cheapest legitimate version is the digital download of Windows 10 Home OEM on sites such as Amazon or Newegg. The ultra-cheap Windows keys available from third party sellers are almost guaranteed to be in violation of the key's terms and conditions, e.g. licensed for use in another country, part of a volume license, or even purchased using stolen credit cards. They may work fine to start with but can be revoked at any time.
Tip: Microsoft has done little to close the loopholes for upgrading to Windows 10 for free, despite officially ending its free upgrade program in July 2016. You can even do a clean installation of Windows 10 on a newly formatted drive and activate it with a valid Windows 7 or 8 key, as I did.
Windows 10 Home vs. Pro: The differences between Windows 10 Home and Pro are covered in this Microsoft Article. The main benefits of Pro are BitLocker drive encryption, Group Policy and some Network-related tools. These are useful but not essential if you have to pay substantially more for them.
Windows 10 Installation Media: You can make an ISO of Windows 10 Pro 64-bit on a 8GB or larger USB stick by running the free Windows 10 Installation Media tool. Format the USB stick in NTFS first or the tool may fail. Once the ISO is created, boot off the USB stick and begin installation of Windows 10.
Disk Format & Partitioning: In the past I recommended preventing the additional partition(s) that Windows automatically creates during Windows installation. Most systems with a UEFI BIOS require these now, so format and partition the drive in the Windows installer and let it create the required partitions. In my case, I created a single NTFS Primary partition taking up the maximum available space on my SSD (456GB) and Windows added a 499MB Recovery partition and a 100MB EFI System Partition.
Protecting Privacy
Privacy is a major concern in Windows 10 due to its rather opaque "Telemetry", which is virtually impossible to disable as noted by a recent German Government Report for example. To view the raw telemetry that Microsoft is sending from your machine go to Settings>Privacy>Diagnostics & Feedback, turn 'View diagnostic data' on, click the 'Diagnostic Data Viewer' button, install the app and launch it to view the data. Some of this is explained in this Microsoft Article. For me the issue isn't a fear of being "spied on" by Microsoft, rather it's the fact that my personal data may be involuntarily stored on external servers and is thus open to being sold, hacked or abused in some way. To control the telemetry as much as possible, you need to go through all of the Settings in Windows 10 carefully.
O&O Shutup10: To save time, you can turn to the free O&O Shutup10 utility to lock down most of the privacy-related features while you determine which you need to leave enabled. I don't have the space or time to detail all of its settings, so below are screenshots of my recommended settings, which you can use as a starting point:
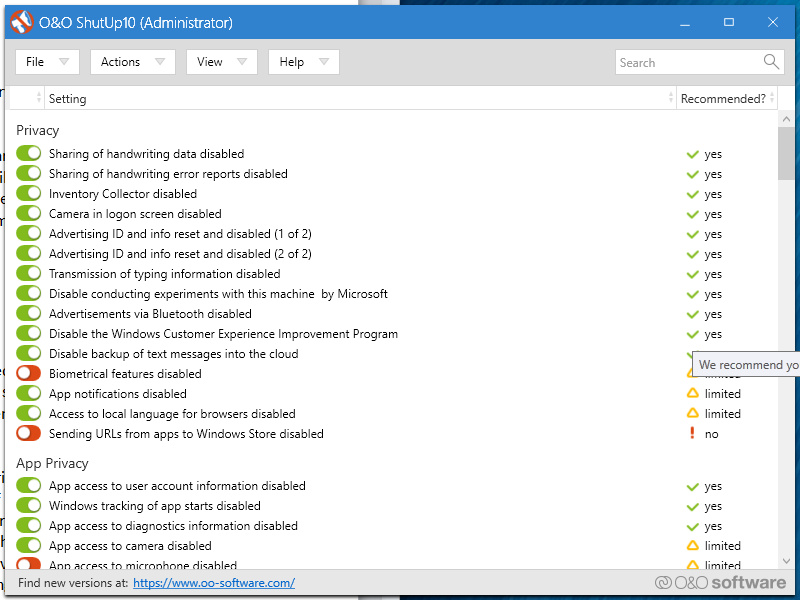
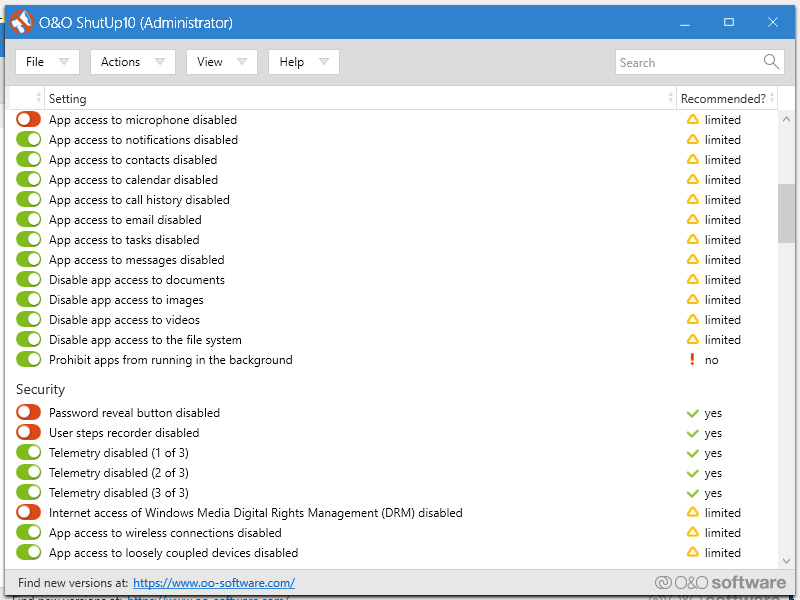
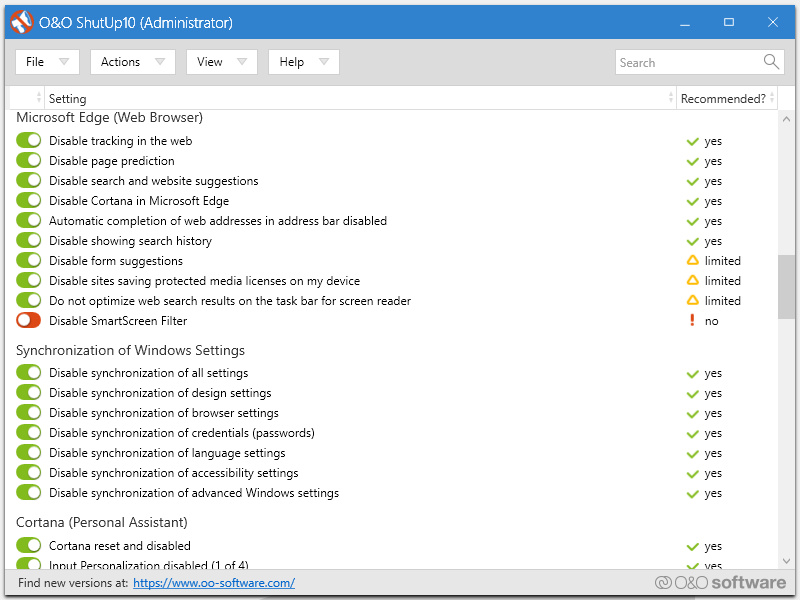
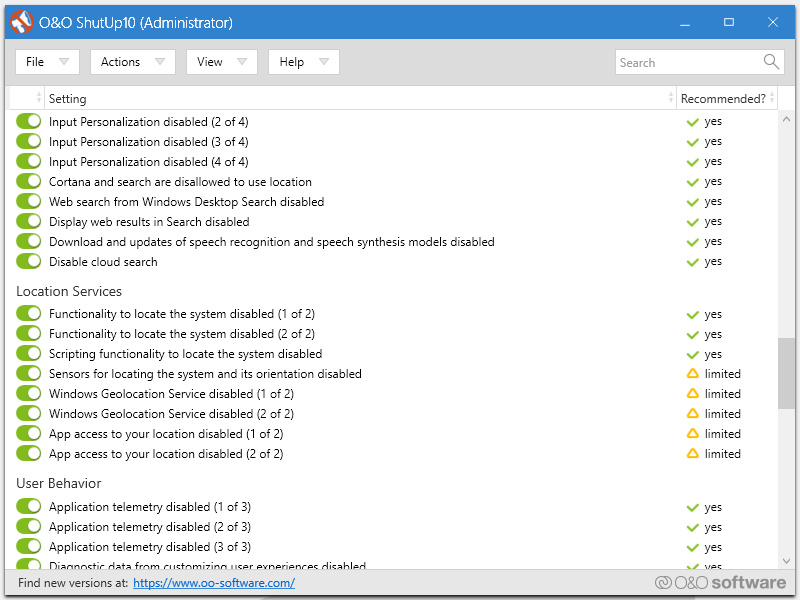
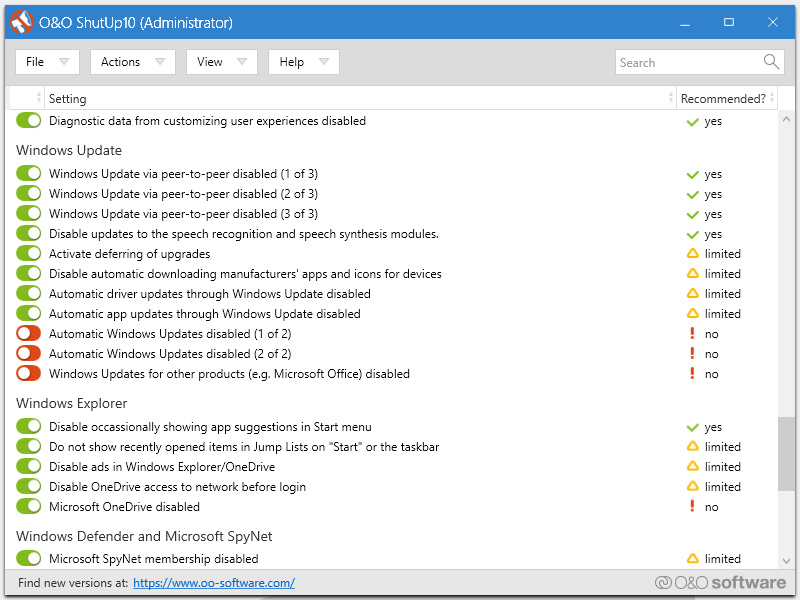
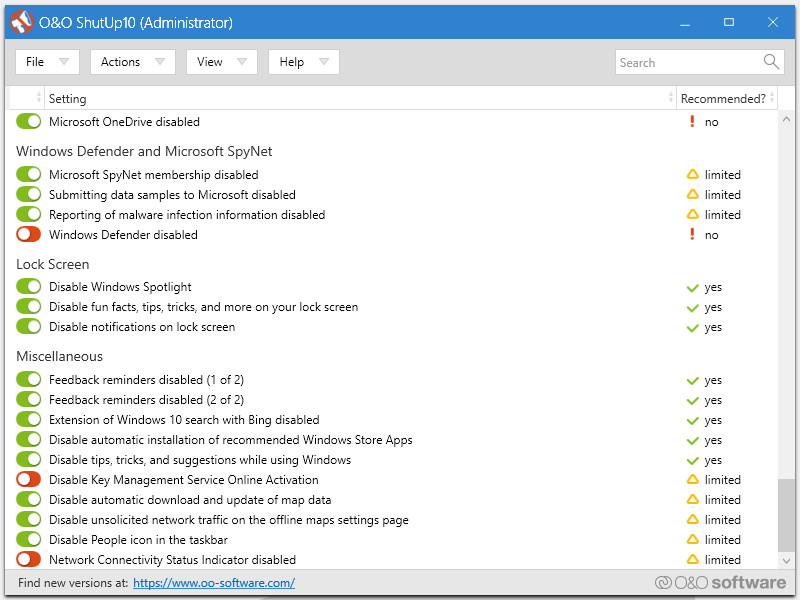
Pay close attention to what you're changing in O&O Shutup10, because it can break a range of features if you block too much, such as Windows Updates. Save your settings when done, and be sure to run O&O Shutup10 after every update, as MS can sometimes "accidentally" reset certain privacy options.
Microsoft Account: If you're genuinely concerned about privacy, then you shouldn't be using a Microsoft Account to log into Windows 10. Unless you use a range of Universal apps, and absolutely must synchronize your Windows 10 settings, documents and apps across multiple Windows-based devices, a Local Account provides the best protection against both having your behavior tracked, and also having someone hack into your account and access your data, given many of the features of a Microsoft Account are web-accessible. Aside from not synching settings, cloud documents, and apps across devices, and not being able to use some Universal apps, there are no drawbacks to using a Local Account. You can still access the Microsoft Store without one, and install genuinely necessary apps and update them, as covered further below. To switch your account from a Microsoft one to a Local one, refer to this Microsoft Article, and also see the User Accounts chapter of the TGTC for general details on these account types.
OneDrive: Windows 10 integrates Microsoft's OneDrive cloud storage service into File Explorer, as did Windows 8 before it. It's covered here because more than anything, using it this way - like another drive connected to the system - is a major privacy concern as well as a significant risk to your data. As I noted in The Primary Drive section earlier, cloud storage can have a valid role in your storage configuration. But not as a place for sensitive or important files, and definitely not implemented in a manner that involves automatic synchronization, so that without your input, your documents are uploaded to a web-accessible resource like OneDrive. Put simply: if someone hacks into your Outlook or Hotmail account, they immediately have access to your OneDrive contents as well. Furthermore, since OneDrive is a free service for many people, and is also dependent on Internet availability, your documents may become temporarily or permanently inaccessible, deleted, altered, etc. and you may have little recourse. This Microsoft Article details how you can hide the OneDrive item in the left pane of File Explorer, or uninstall it altogether.
Driver Essentials
Immediately after Windows 10 installation is complete, there are important driver-related tasks that you need to undertake:
Disable Automatic Driver Updates: Prevent automatic installation of unnecessary, outdated or unwanted drivers.: Go to Control Panel>System, click 'Advanced System Settings' in the left pane, select the Hardware tab, click 'Device Installation Settings' and select No. For greater protection, use the Group Policy Editor in Windows 10 Pro (Start>gpedit.msc), go to Computer Configuration>Administrative Templates>All Settings, click the Setting column header to sort alphabetically, and select Enabled for 'Do not include drivers with Windows Update'. In Windows Home there is no Group Policy, so open Registry Editor (Start>regedit), go to HKEY_LOCAL_MACHINE\SOFTWARE\Policies\Microsoft\Windows and set ExcludeWUDriversInQualityUpdate=0. If a WindowsUpdate sub-folder doesn't exist, right-click on the Windows key and select New>Key, call it WindowsUpdate, and in the right pane create a new DWORD (32-bit) called ExcludeWUDriversInQualityUpdate and give it a value of 0. For a more comprehensive approach, see this article.
Remove Unwanted Driver Packages: An existing installation of Windows 10 may have many different versions of drivers installed over time. A thorough cleanout of the stored driver packages may be needed, not so much to reclaim drive space, but to prevent older versions of drivers installing whenever you uninstall the latest driver. The quickest way is to use the free DriverStore Explorer. Tick all of the packages that you have researched as being unnecessary (i.e., older or undesirable driver versions, drivers for devices you no longer use, etc.), or just click the 'Select Old Drivers' button, then click the 'Delete Package' button. Use Safe Mode and/or the Force option in RAPR to remove currently-used drivers. Also refer to the Disabling or Removing Unused Devices section in the Hardware Management chapter of the TGTC to clean out Device Manager references (and drivers) to devices that you no longer use.
Required Drivers: The following are the necessary drivers you should install, in roughly the order provided below:
Samsung NVMe Driver - Substitute the relevant driver for your drive if it's not a Samsung NVMe. Note: Intel Rapid Storage Technology (RST) drivers are not required unless you run an Intel Optane or RAID drive configuration; drive utilities such as the Intel SSD Toolbox, Samsung Magician and Corsair SSD Toolbox are optional, and aren't drivers, nor impove performance.
Intel Chipset Drivers or AMD Chipset Drivers - This small but necessary driver installs INF files that help Windows to identify your motherboard components. Important: The Intel Management Engine drivers (and the AMD Trustzone equivalent), are sometimes mistaken as the chipset drivers, but they're largely unnecessary and undesirable except for one small part; see further below for details.
Nvidia, AMD or Intel GPU Drivers - Even if you don't game, installing the latest graphics drivers improves general responsiveness on the Desktop and can resolve issues. Nvidia users can refer to this older, but still largely valid Nvidia GeForce Tweak Guide, and you can use the free Display Driver Uninstaller and Nvidia Display Driver Slimmer utilities to first remove all traces of current and older Graphics drivers, then strip undesirable components from the GeForce driver package before installing it.
Audio Drivers - Relevant Audio drivers are available from your motherboard or sound card manufacturer's website. Audio drivers aren't necessary but are recommended for optimal audio functionality. See the Input, Audio & Optical Drive section of this article for more details.
The drivers above are all you need in terms of core drivers to ensure optimal functionality and performance in Windows 10. Most other devices, e.g., mice, keyboards, printers, monitors, Wi-Fi adapters, etc., are best left on the default Microsoft drivers included in Windows 10. Only install a driver if the device is not functioning correctly, such as missing features, poor performance, or a yellow exclamation mark in Device Manager.
Microsoft Update Catalog: If you can't find the drivers you need, and don't want to run Windows Update and let it install the relevant driver, you can manually search the Microsoft Catalog for basic drivers that MS makes available via Windows Update. Enter the specific make and model number, e.g. Realtek ALC S1220A HD or a more general description, e.g., Realtek High Definition Audio. Click on the column headers to sort the resulting list.
Driver discs: Your motherboard or device may come with a driver disc. Keep the disc, but don't run it in the first instance, because the drivers on it are often quite outdated and it may also install undesirable software utilities.
Universal Windows Drivers
An important new development in Windows 10 is the transition to Universal Windows Drivers (UWD), also referred to as Windows Modern Drivers, or Declarative Componentized Hardware (DCH) drivers. The goal of this driver model is to have a unified driver package that can install across a range of devices, and removes bloatware. This single driver package is restricted to containing: a base driver for core functionality; optional component packages for any customizations or additional settings; and a support app, such as a control panel.
Intel was the first major player to get publicity for switching to UWD when they announced that their Intel Graphics Drivers would only be provided as DCH Drivers from October 2018 onwards. Nvidia has also quietly started releasing DCH drivers on their Driver Download Page alongside their regular driver set. You may not have noticed them because you need to manually select DCH under the Windows Driver Type drop-down box that says Standard by default. As for audio, Realtek has made UWD drivers available, along with the new Realtek Audio Console app to control the driver features, which I cover in more detail in the Input, Audio & Optical Drive section of this article.
The general idea of UWD is that it makes driver installation easier: you run the installer, and regardless of which hardware you're running, it determines the correct driver for your system, installs it, along with any necessary add-ons, and an optional supporting app like a control panel.
Intel Management Engine
The Intel Management Engine (IME) is a special driver package worthy of a closer look because it can be a source of confusion as well as major privacy concerns. IME began as a separate low-power sub-system on Intel CPUs, and seems to have eventually become a full-blown co-processor. It functions independently of the main CPU, and also runs whether or not your PC is on or off, or even has power. If this sounds ominous, then installing the IME package can heighten concerns because it contains components with names such as Intel Active Management Technology, Intel Capability Licensing Service and Intel TPM Provisioning Service.
Some assume this is Intel's way of controlling your system. Various rumors also abound that it enables an NSA back door. AMD has an equivalent called TrustZone, powered by an ARM co-processor, and is examined more closely in this article. A security vulnerability was recently revealed in IME, and Intel has released a Detection Tool that can tell you whether your CPU is affected. This has made paranoia about IME even greater. Some people have even devised ways they say will work in disabling IME, as covered in this article for example.
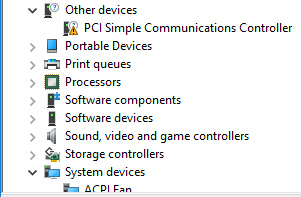
However, the Intel Management System has an important role in managing the CPU, it's not just a security-related chip. It's meant to monitor the CPU, and manage a range of functions, including interfacing between the CPU and the OS, for optimal performance. The good news is that we can install just the one core driver needed for IME to work, without all of the additional services and drivers the IME package installs. According to the article linked further below, as well as my own testing over several weeks, the key driver that's needed for IME is TeeDriverW8x64.sys, where Tee stands for Trusted Execution Environment. This driver is required for the Intel Management Engine Interface device, found under the System Devices category of Device Manager. When you first install Windows, this may appear under an Other Devices category in Device Manager, as a 'PCI Simple Communications Controller'.
If you're on an existing installation of Windows 10, you can attempt to uninstall the Intel Management Engine software, but it's quite difficult to remove it completely. Uninstall it as normal, then reboot and run the Autoruns utility and temporarily disable any Intel-related scheduled tasks, services and startup items that are listed. Reboot again, and manually delete directories such as: \ProgramData\Intel\iCLS Client\; \Program Files (x86)\Intel\Intel(R) Management Engine Components\; \Program Files\Intel\Intel(R) Management Engine Components\; \Windows\System32\Intel\. Lastly, use the DriverStore Explorer to find any packages you suspect are related to Intel IME and remove them.
Once you've cleaned out IME, or if IME hasn't been installed yet, you can proceed to download a small package, containing the relevant files to install just the necessary Tee driver, from the bottom of the first post on this page. Alternatively, you can go to your motherboard manufacturer's website and download the relevant package contain the IME files and extract the desired driver. My example refers to the IME package ASUS provides as its Chipset Driver: download and extract its contents, and rename the SetupME.exe file to SetupME.zip; open this file, and extract ME_MEI_Drivers_x64.exe, then rename it to .zip; open it and extract the drivers.cab file; lastly, rename drivers.cab to .zip, and extract its entire contents to an empty directory. Make sure there are no other files or folders in this directory, and delete the other extracted driver files and folders. Open Device Manager, go to system devices and double-click on the 'Intel Management Engine Interface' item, or the 'PCI Simple Communications Controller' with a yellow exclamation mark. Select the Driver tab, click 'Update Driver', then select Browse, choose 'Let me pick', and browse to the directory where you extracted the drivers and click OK.
My system has been running this configuration - i.e, only using TeeDriverW8x64.sys - for several weeks now, and all of the results you see in the System Core: Overclocking section of this article for example, showing low wattage and high frequencies, were achieved this way, so performance and stability won't suffer without the other IME components.
ASUS Update Check
On the topic of unnecessary files, ASUS has unfortunately decided to start including a small startup program called AsusUpdateCheck on the new Z390 motherboards, as detailed in this article. As the article points out, it's likely installed by the UEFI BIOS. Once on your system, it can be found under the Services utility as AsusUpdateCheck. Disabling or deleting the service and/or deleting the file doesn't remove it, it reappears at next boot.
There's a simple way you can render it useless. I use the following method for any service or startup program that refuses to be removed (e.g., Adobe's Update Checker files AdobeARM.exe and AdobeARMHelper.exe). Replace as many files as are necessary (of whatever type) with renamed copies of a harmless dummy file. However, the dummy file can't just be a normal file that's been renamed, such as a blank text file. Go to your \Windows\System32\ directory and copy rundll32.exe (this is a core Windows utility that loads DLL files), then paste it into an empty directory, and rename this copy to AsusUpdateCheck.exe. Move it to your \Windows\System32\ directory, overwriting the original AsusUpdateCheck.exe file that's there. Leave the AsusUpdateCheck service set to Automatic. Reboot, and while AsusUpdateCheck will still load up at each startup, it is just this 70kb dummy file, which is incapable of any actual feature or function, given the way it's been called.
The next page continues the Windows 10 tips, and brings the article to a conclusion.
|
|