
Nvidia GeForce Tweak Guide
[Page 3] Clean Installation Methods
In this section we first look at how to familiarize yourself with your Nvidia graphics card, also known as a Graphics Processing Unit (GPU), and its capabilities. Then we examine in detail the ways in which you can completely uninstall all traces of current and previous graphics drivers from your system in preparation for what is known as a "Clean Installation". Following the advice in this section will help to ensure that you have smooth, trouble-free performance from your GPU, minimizing driver issues as well as reducing wasted drive space.
Update: This page and the next have been updated as of October 2019.
Identifying Your GPU
Before you can install any drivers for it, or perform any customization of its settings, you must get to know your graphics card's key specifications and capabilities. Fortunately there's a simple free graphics card information utility called GPU-Z that allows you to do this. Download the latest version of GPU-Z, launch it and you should see an information panel that looks like this:
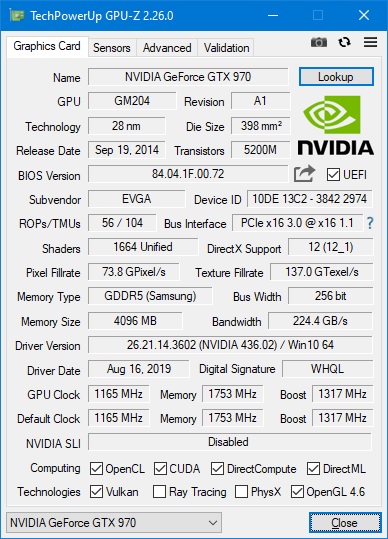
To understand what each of the fields in the GPU-Z interface shows, first click on the small GPU icon shown at the top left corner of the GPU-Z window and select Settings, or click the hamburger button at the top right of the main screen, then make sure the 'Enable Help Tooltips' box is ticked. With this option ticked, whenever you hover your mouse cursor over a field, a small popup box appears with a description of that field.
To get a rough idea of where your particular graphics card stands in terms of gaming performance, do a web search on your GPU's name combined with the word review (e.g. "GTX 970 review"), and read various hardware reviews of your card both to see how it performs in a range of games at various resolutions, and to also find out more about its strengths and weaknesses. In particular I recommend the GPU reviews at AnandTech as being useful, accurate and unbiased. You can also refer to general GPU comparison charts such as the ones found here and here. To view a full historical list of all Nvidia GPUs and their specifications see this Wikipedia Article, or refer to the GPU-Z GPU Database.
Other useful features of GPU-Z worth noting here include:
Sensors: Under the Sensors tab in GPU-Z you will find the hardware monitoring features, the use of which is covered in detail in the Advanced Tweaking section later in the guide.
PCI-E Speed: The main Bus type (communication pathway) which connects your GPU to the motherboard and the rest of your system is shown in this box under the main Graphics Card tab. For all modern GPUs this is a PCI Express bus, or PCI-E for short. The information shown in this GPU-Z field displays firstly the revision of the PCI-E interface your motherboard supports (i.e. PCI-E 1.1, PCI-E 2.0, PCI-E 3.0 or PCI-E 4.0), and secondly, the maximum Link Width of the connection (i.e. x1, x4, x8, x16). The higher the PCI-E revision, and the greater the number of lanes displayed for the link width, the more information your GPU can transfer to your system and vice-versa at any one time, which can improve performance.
The numbers after the @ symbol show your current connection speed, which may be lower than your maximum due to the GPU typically being in power-saving mode on the Desktop. To correctly test your maximum PCI-E bandwidth, click the '?' next to the Bus Interface field in GPU-Z, then click the 'Start Render Test' button. This should bring the GPU completely out of power saving mode and display the correct link speed and width. You can stop the Render Test at any time just by clicking the X at the top right of it.
You can't alter the PCI-E version of your GPU or motherboard. If your motherboard supports PCI-E 2.0 and your GPU supports PCI-E 3.0 for example, then your system can only run at PCI-E 2.0 as a maximum. However, you may be able to adjust your link width in the BIOS/UEFI. For most gaming workloads on a single GPU, the difference between PCI-E 2.0 and 3.0 has been shown (e.g. here, here and here) to be negligible, as long as x16 link width is enabled. The difference between PCI-E 3.0 and 4.0 is also largely irrelevant for GPUs, but can make a difference for fast storage devices, such as NVMe SSDs, connected to the PCI-E bus (e.g. as shown here). Refer to your motherboard manual to find the maximum PCI-E revision and link width it supports for single and multi-GPU (SLI) configurations, as well as where in the BIOS/UEFI the link width can be adjusted if possible. Make sure that you are running x16 on a single card configuration, and x8/x8 or x16/x16 on an SLI configuration, depending upon your motherboard's maximum link width capabilities in SLI mode. Also note that Windows power management may affect your link width and cause it to fluctuate. You should disable any power saving features which affect this - see the Power Options section of the TweakGuides Tweaking Companion for more details on the various power management settings.
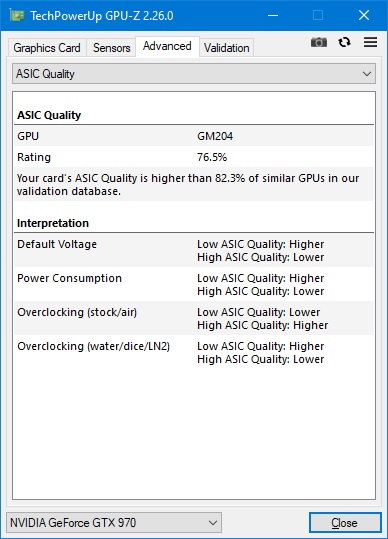
ASIC Quality: Go to the Advanced tab of GPU-Z, and click the drop-down box at the top which says General, then select 'ASIC Quality'. If your GPU supports this information, you will see details of your particular GPU's ASIC quality rating as a percentage. ASIC stands for Application-Specific Integrated Circuit, and in general terms, the ASIC quality of a GPU is meant to represent its overall quality based on electrical leakage data. Graphics cards with a higher ASIC quality typically run at lower voltages and consume less power, and thus it may be possible to overclock them further by increasing their voltage. This article cites Alexey Nikolaichuk (a.k.a. Unwinder, the author of the RivaTuner and Afterburner GPU utilities) as providing an example of ASIC quality correlation to voltage: an ASIC quality of <75% = 1.1750V, while an ASIC quality of around 100% = 1.0250V.
In practice ASIC quality has no real impact on performance during the normal usage of your GPU; it is only a very general indicator of electrical leakage, and thus peak efficiency and hence overclockability. There is nothing you can do to alter your card's ASIC quality short of replacing it, so it's not something to be overly concerned about unless you specifically purchased the GPU for the purpose of winning overclocking or benchmarking competitions. Note that for Nvidia GPUs, ASIC Quality readings are only supported on the GTX 400 series and above, and are not supported on some of the latest GPU series.
Removing Previous Graphics Drivers & Settings
Installing a new version of the GeForce graphics driver is usually a relatively straightforward procedure, as covered on the next page of this guide. However, it is highly recommended that you do a "clean installation" - that is, first remove all previous versions of Nvidia graphics drivers and settings - particularly under the following circumstances:
The logic behind doing a clean installation is that sometimes what is known as "driver residue" may cause unintended consequences on your system. Driver residue refers to older, mismatched or corrupted versions of various driver file components and Registry entries spread throughout your system. It is best to remove all traces of current and previous graphics drivers and settings so that you can start again with a clean slate.
Importantly, before using any of these methods it is strongly recommended that you:
For more details on backup methods and the System Restore feature, see the Backup & Recovery chapter of the TweakGuides Tweaking Companion.
Once you've taken the precautions above, you can move onto doing a clean installation of the GeForce drivers. The two general methods are the Automated Methods, and the Manual Method. The automated methods are faster and much simpler, and using the Nvidia Driver Slimmer and Display Driver Uninstaller utilities in particular is the method I personally use, and the one I recommend for most users. It's the one most likely to ensure a completely clean installation and hence minimal problems. The manual method takes longer and is more difficult, but allows you to have full control over every step, and lets you see what exactly is going on. It is only recommended if you are having major problems with your graphics driver, and the automated methods don't work to resolve them.
Automated Methods
Nvidia Clean Install
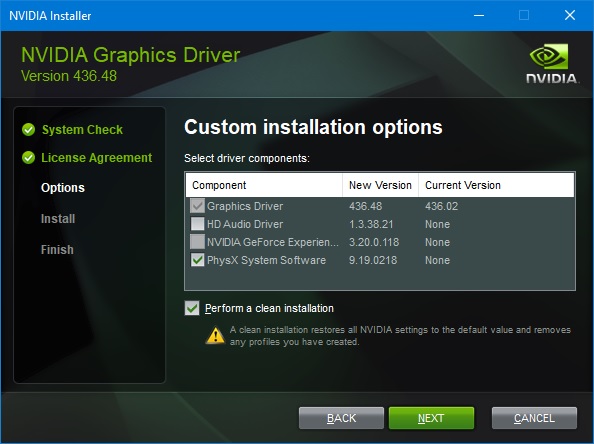
The simplest, safest and most basic method of doing a clean and minimal installation is to download the latest GeForce graphics driver package, launch it, select 'Nvidia Graphics Driver' to prevent GeForce Experience from installing, then choose the 'Custom (Advanced)' option, and after choosing the relevant driver components you wish to install (see the GeForce Driver Package section), tick the 'Perform a clean installation' box, then click Next. This triggers the built-in Nvidia clean installation option, which appears to be reasonably effective from my testing. It uninstalls previous versions of the Nvidia drivers, including those held in the Windows Driver Store, as well as deleting the main Nvidia directories and files throughout the system. It also resets the driver settings held in the Nvidia Registry entries to their default values. It's not perfect though, because in my testing it did leave some Nvidia folders and drivers/files resident on my system. But on the whole it clears out the most important files and settings, and is extremely easy and safe to use. If you're wary of using third party utilities such as the one below, or don't feel confident using the manual method, then the clean install option in the GeForce drivers is perfectly adequate for normal updating.
Recommended Method: Nvidia Driver Slimmer + Display Driver Uninstaller
Nvidia Driver Slimmer (NVSlimmer) is a free third party tool developed to allow you to quickly remove the various components of the Nvidia Driver Package which you may consider superfluous, and it will then simply repackage the Nvidia driver installer with only the components you've chosen, without altering anything else. This not only results in a much smaller file if you want to store or send the driver package to someone else, more importantly, it ensures that when you run the package to install the drivers, it cannot and will not install superfluous drivers and files, such as the Telemetry service(s), because they're simply not there to begin with. Download the latest version from the bottom of the page linked above, and run the archived file to extract the NVSlimmer utility, then launch NVSlimmer.exe.
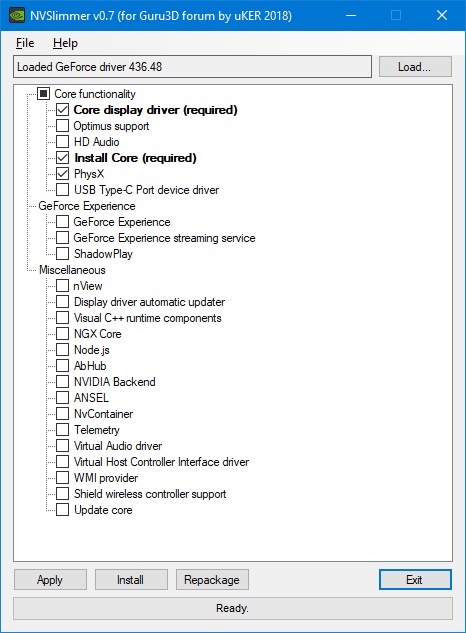
As soon as it is launched, NVSlimmer will prompt you to point it to an Nvidia Driver Package that you wish to reconfigure. If you haven't downloaded an official driver package, Cancel and exit NVSlimmer, and do so, then relaunch it when ready. Browse to the relevant directory where the official Nvidia GeForce driver package resides, select it and click Open. Once NVSlimmer has internally extracted and loaded up all of the driver package files, it will display a set of options similar to those shown above. These are all of the various components contained in the current driver package. 'The Core Display Driver' and 'Install Core' components must be installed and cannot be unticked; these are the necessary components for your Nvidia GPU to function correctly. For most gamers, I recommend selecting the PhysX component as well, because some games require PhysX drivers to make full use of any hardware-accelerated dynamic physics effects. If you don't game, or you're sure that your games don't use it, then PhysX can be unselected. The remaining components are entirely optional, and indeed for most non-gamers, none of them is required.
However, every person's situation is different, so you may have to do some research. For example, if you have an Nvidia Shield device, you will probably want the 'Shield wireless controller support' option enabled. Similarly, if you use Nvidia-based audio on your system, then 'HD Audio' is best ticked to allow you to install the HD Audio drivers for full audio functionality. See the component listing on the next page, and keep in mind that at this stage we're simply choosing what NVSlimmer keeps or removes in the repackaged driver installer it will create. So if in doubt as to whether a feature you need uses a particular item listed in the NVSlimmer options, you can select it just to be safe, because it doesn't mean it will automatically be installed; it will just be retained in the installer package.
Once you've finalised what you want, click the Apply button, and I suggest selecting No at this stage when prompted to install - we just want to finalise our selection for now. The next step is to click the Repackage button, and choose where the output will be placed. The original driver package won't be altered; a new installer which only contains your chosen components will be created with the name of the driver version, e.g. NVIDIA 436.48.exe. Launching this executable will begin the normal Nvidia driver installation procedure, except, as expected, you won't be offered and/or simply won't be able to successfully install components that you've removed, or which are dependent on the components you've removed.
You will still need to use the Display Driver Uninstaller utility, as covered below, to ensure a clean install when using this driver package.
Display Driver Uninstaller (DDU) is a free third party tool developed specifically to automate the process of removing all driver residue so you can install a new driver as cleanly as possible. Download the latest version of DDU from the bottom of the page linked above, and run the file to extract the DDU utility, then launch Display Driver Uninstaller.exe. Upon first startup, DDU will prompt you to select from a range of options. I strongly recommend unticking everything except the 'Create a system restore point' and the 'Save log files in startup path' options for now, then clicking Close. You can review and readjust these options as needed by clicking the Options menu item in the main DDU window at any time. If you're prompted to boot into Safe Mode, click the small X at the top right of the prompt window to close it without booting into Safe Mode. You should first read all of the information below.
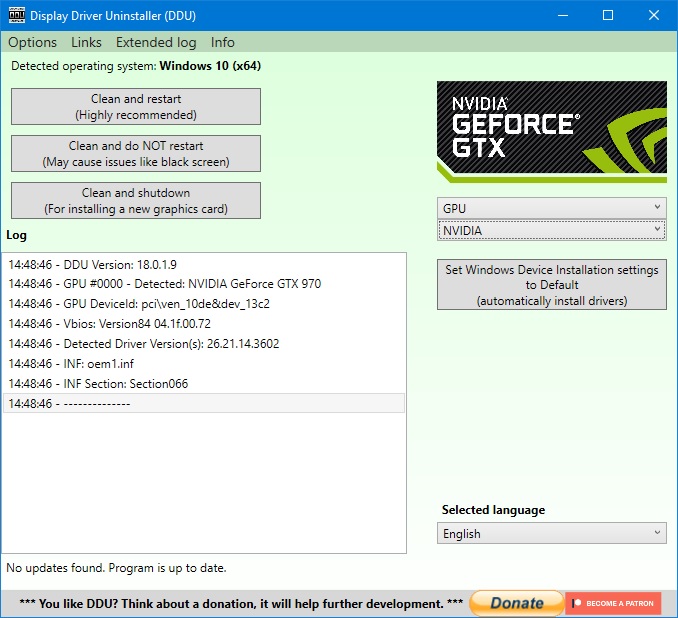
When on the main DDU screen, in the top right drop-down box, select GPU, and if it isn't detected automatically, select Nvidia. At this point, while it's perfectly fine to just click the 'Clean and restart' button, it's not optimal. DDU cannot remove all graphics driver-related files using this method, because some may be in use by the system. Furthermore, as soon as DDU cleans out all of the relevant driver-related files from your system and reboots, Windows will detect the lack of a proper driver for your GPU and install the most recent Nvidia graphics driver it has previously stored a copy of in the Driver Store (discussed in the Manual section further below), and/or check and download the latest version from Windows Update. We don't want either of these things to happen because it defeats the purpose of doing a clean install.
The optimal method for using DDU is to first ensure that you've disabled automatic driver updates in Windows, either by following the instructions in the previous section further above, or by going to DDU's options and ticking the 'Prevent downloads from Windows Update' box at the bottom. Next, I recommend manually booting into Safe Mode, because it is only in this mode that Windows is prevented from loading up any third party drivers or startup programs, thus allowing them to be properly deleted by DDU.
To manually boot into Safe Mode in Windows before launching DDU:
Windows Vista & Windows 7: Reboot your system and keep pressing F8 at system startup until the Advanced Boot Options screen appears, then select the Safe Mode item and press Enter.
Windows 8/8.1 & Windows 10: Go to (PC) Settings, select Update and Recovery in Windows 8.1, or Update & Security in Windows 10, select Recovery, click the 'Restart Now' button under Advanced Startup, then choose Troubleshoot>Advanced Options>Startup Settings>Restart and press 4 to launch Safe Mode.
Once in Safe Mode (as denoted by 'Safe Mode' text in each corner of the screen), launch DDU as normal, select GPU>Nvidia in the drop-down boxes again, then click the 'Clean and restart' button. This time, DDU will be able to remove all GPU driver-related files, both current and old, and when it reboots back into the normal Windows environment, you should see that your desktop has changed to the default (non-native) Windows resolution. You can now launch the Nvidia driver package of your choice, such as the one you created with NVSlimmer earlier.
Manual Method
This method is only recommended for advanced users. It is a longer, more complex, clean installation method which puts everything in your control and does not rely on any third party tools, instead using standard Windows features and built-in safeguards. There is less chance of anything randomly messing up your system, and it will also help you to better understand the driver installation/storage process in Windows, which will aid you in future troubleshooting.
It's important to understand why the process below is so complex. If you've previously installed any version of the GeForce drivers on your system, Windows holds a copy of each driver package's contents in what is known as the Driver Store, in a series of folders found under the \Windows\System32\DriverStore\FileRepository\ directory. If you simply uninstall the current GeForce driver, even in Safe Mode, Windows will automatically revert to what it considers the next best available graphics driver for your GPU, which is the next most recent GeForce driver held in the Driver Store. Windows does this to make device installation easier for novices, but it creates a problem when doing a clean install because once an older driver package is in use by Windows, it can't be deleted. Even if you delete the package in Safe Mode, Windows has already copied the relevant driver files to the \Windows\System32\Drivers\ directory and will continue to use them until you manually find and delete each of those files too, which is a messy process. So instead I use the procedure below, which I have tested several times, for the cleanest results.
Please read these instructions carefully, and follow them exactly as shown, in the order shown, otherwise the clean install will not work properly:
1. For the purposes of doing a thorough clean installation, we must first delete all of the previous GeForce driver packages held in the Windows Driver Store before uninstalling the current driver. As an added bonus, deleting these older driver packages will free up a fair bit of otherwise wasted drive space. The manual method to clean out the Driver Store of old GeForce drivers can be a bit tricky, so an automated tool for cleaning out the Driver Store is also provided. The manual method is as follows:
i. Open an Administrator Command Prompt by typing CMD in the Start Menu or on the Start Screen, right-click on the first search result and select 'Run as Administrator'.
ii. Type pnputil -e in the command prompt and press Enter. This will initiate the Windows PnP (Plug & Play) Utility for managing the driver store, and list all of the driver packages stored there.
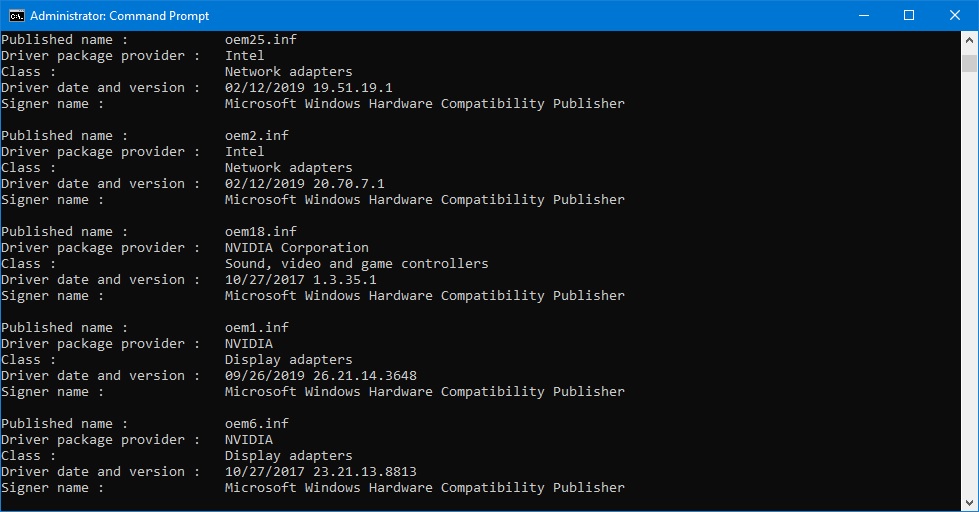
iii. Scroll through the list, looking for Nvidia-related entries. All entries where the Driver Package Provider is listed as Nvidia can be removed. In the example shown in the image above, two Nvidia Display Adapter packages are shown. Note down the Published Name for the Nvidia Display Adapters entries you wish to remove, which in the example above are oem1.inf and oem6.inf.
iv. To properly delete a package from the driver store, use the pnputil -d command combined with the published name of the packages derived from Step 3 above. For example, I would enter pnputil -d oem1.inf and press Enter to delete one of my older GeForce driver packages from the driver store, then repeat the process using pnputil -d oem6.inf to delete the next one, and so on as required.
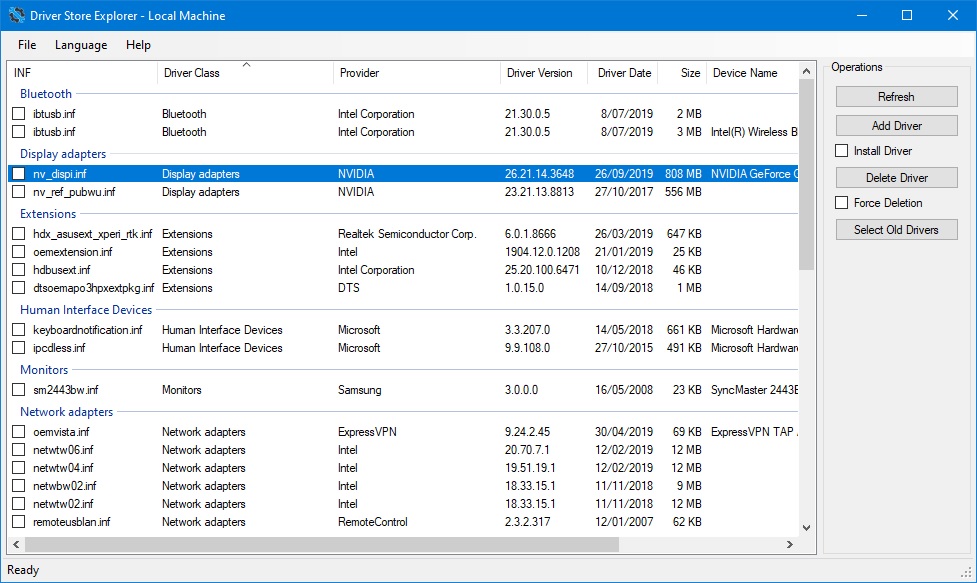
If you don't feel comfortable using the PnPutil utility via the command prompt as covered above, and frankly, it's a very complex and dangerous way of doing things, you can instead use the free Driver Store Explorer utility. On the Github page for the utility, go to the bottom and click the link under Releases, then select the main DriverStoreExporer[version number].zip file. Extract its contents, right-click on the rapr.exe file and select 'Run as Administrator' to correctly launch the utility. Click the Enumerate button to display all relevant driver packages held in the Driver Store, then tick all packages listed as being provided by Nvidia, and click the 'Delete Package' button.
Note: If you try to delete the GeForce driver package your system is currently using from the Driver Store, Windows will report that it is in use and cannot be deleted. This is normal; in the next step it will also be removed.
2. Having removed the previous driver packages from the Driver Store, it is now fine to go ahead and uninstall the current Nvidia GeForce driver. Open the Programs and Features component of the Windows Control Panel. First uninstall any AMD Radeon driver-related entries if you previously had an AMD graphics card installed on your system. Next, uninstall any Nvidia components, such as any of those listed below, making sure to uninstall the Nvidia Graphics Driver component last:
Nvidia 3D Vision Controller Driver
Nvidia 3D Vision Driver
Nvidia PhysX System Software
Nvidia GeForce Experience
Nvidia HD Audio Driver
Nvidia Miracast Virtual Audio
Nvidia Graphics Driver
The function of each of these driver components is covered in more detail on the next page of this guide. For now, we want to remove all of them because the latest GeForce driver package you're going to install later on already contains the most recent version of each of these components should you need them. Furthermore, as we shall see later in the guide, you probably won't need to install most of these components anyway.
Note: When the HD Audio, Virtual Audio and Graphics Driver components are each uninstalled, they will typically require a restart. It is a normal Windows safeguard that any file which is currently in use by the system cannot be deleted while it is in use, so a reboot is requested so that Windows can cease using the file(s) and delete them safely. Reboot your system each time, but again, make sure the Nvidia Graphics Driver component is the last one to be uninstalled.
3. Upon booting back into Windows after uninstalling the Graphics Driver component, your graphics card will be detected. If you've performed Step 1 properly, Windows should automatically install the Microsoft Basic Graphics Adapter driver, which is the built-in Windows graphics driver, as it will not be able to find any GeForce drivers in the Driver Store to use instead. To actually confirm the driver which is currently being used, launch GPU-Z and check the Driver Version field - it should say Forceware 0.00; or go to Windows Control Panel>Device Manager>Display Adapters, right-click on the GPU name, select Properties>Driver and it should show an old Microsoft driver in use. The GeForce drivers and associated files are no longer in use by Windows and are free to be deleted in the next step.
4. Clean out all remaining traces of Nvidia GeForce-related files and settings, which will also free up even more drive space. To remove the main Nvidia directories on your system, open Windows Explorer/File Explorer and delete the directories listed below, including all sub-directories. Note that C: here refers to your main system drive (where Windows is installed), which may have a different drive letter on your system:
C:\NVIDIA
C:\Program Files\NVIDIA Corporation
C:\Program Files(x86)\NVIDIA Corporation
C:\ProgramData\NVIDIA
C:\ProgramData\NVIDIA Corporation
C:\Users\[Username]\AppData\Local\Nvidia Corporation
C:\Users\[Username]\AppData\Roaming\NVIDIA
Note: If you run into a 'File in use' error while trying to delete any of the directories above, this means the clean install has failed, as Windows is still using some of the driver files. Rather than messing around trying to find the individual files to delete, reinstall the GeForce drivers and carefully restart the process from Step 1 again, or just use the automated method instead.
5. To be absolutely thorough, you can also delete the main Nvidia entries held in the Windows Registry. Open the Windows Registry Editor by typing Regedit in the Start Menu or on the Start Screen and pressing Enter. Navigate to the following keys and delete them:
HKEY_LOCAL_MACHINE\SOFTWARE\NVIDIA Corporation
HKEY_CURRENT_USER\Software\NVIDIA Corporation
If you're not familiar with using the Registry Editor and/or want to know how to make a backup before deleting a Registry entry, see the Windows Registry chapter of the TweakGuides Tweaking Companion for details. In any case, this step isn't absolutely necessary, because if you use the built-in clean install option of the latest GeForce drivers during installation (which is recommended), it will do a good job of resetting the Registry entries back to their defaults.
6. If you want to be completely sure that no Nvidia driver-related file is in use by the system, download the free Autoruns utility, and extract and launch the Autoruns.exe file. Under the Options menu make sure that the 'Hide Microsoft Entries' and 'Hide Windows Entries' items are ticked. Then select the Drivers tab, and look for any entry where Nvidia is the publisher. If you find any, right-click on the entry and select 'Jump to Image' and delete the file, then right-click on the entry and select Delete to remove it. If you get a 'File in use' error while trying to delete the file, the clean install process hasn't been successful; reinstall the GeForce drivers and carefully restart the process from Step 1 again, or just use the automated method.
As a final piece of advice on this topic, if you've switched from an AMD to an Nvidia GPU on the same installation of Windows, or are experiencing serious errors such as Windows blue screens, then instead of relying on the clean installation process, I strongly recommend a full, clean, reinstallation of Windows. This will save you a great deal of effort in the long run, as many other issues and problems can occur if you don't do a clean install of Windows after upgrading major hardware components. This is particularly applicable to users who've switched graphics card brands; a clean install of Windows followed by a fresh installation of all of your programs and games will install and set the correct game/program components, configuration files and Registry entries that might otherwise be inappropriate your new GPU.
The next section details how to download and correctly install only the necessary components of the GeForce driver package.
|
|