Quake 4 Tweak Guide
[Page 6] In-Game Settings (Pt.2)
[Advanced Settings]
Clicking this option takes you to a range of settings which allow you to fine tune the graphics in Quake 4. These are each covered below:
High Quality Special Effects: With this setting set to Yes, Quake 4 will use a range of advanced graphical techniques to increase your immersion in the game. For example, looking at a column of fire will produce a highly realistic heat haze effect. These effects take some graphical power to produce, so disabling this option (setting it to No) will improve your performance at the cost of realism and immersion.
Enable Shadows: This setting determines whether you see any real-time shadows cast for objects in the game. If set to Yes you will see most objects casting very realistic shadows, which move with dynamic sources of lighting (such as swinging lamps for example), however your FPS will be lower as your system has to do more calculations to determine where shadows are cast at any point in time. This is particularly noticeable when there are multiple characters/enemies on the screen, as they cast very complex shadows. If set to No, these shadows will disappear, although this doesn't mean all the areas of darkness in the game will be removed. Your performance will improve, but the atmosphere of the game may suffer somewhat. If you feel comfortable turning this option off, then the performance improvement (which is significant on many systems) may be worth it.
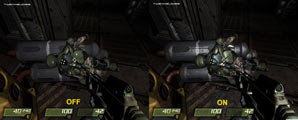
Enable Specular: If set to Yes, specular lighting gives the surfaces of objects, ranging from metals to skin, a realistic sheen. When combined with Bump Maps (see below), this option creates a very plausible illusion in Quake 4 that your surroundings are real. However obviously it reduces performance, so if you're after more FPS and don't mind the drop in realism, set this option to No. See the screenshot comparison above, where the difference between enabling and disabling specular is quite obvious.
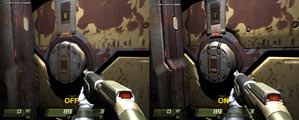
Enable Bump Maps: Bump mapping is an effect which makes 2D textures appear as though they are 3D, with depth and grain. If set to Yes, surfaces will appear much more realistic, especially when light shines on them, however your performance will be lower. Again, if you need the extra FPS then turn it off. The screenshot comparison above shows that with bump mapping disabled, surfaces appear much less 3D.
Enable Detailed Sky: If set to Yes, shows the sky as normal in outdoor areas. If set to no, the sky is always shown as flat black, with no details. While this can help improve FPS slightly, the main use would be to make it easier to spot the enemy and things like rockets.
Force Ambient Light: If set to Yes, this option forces a single ambient light to be used throughout each level. This can improve FPS in areas with multiple lights, as they will be replaced with the ambien light. You can control the level of ambient brightness using the slider below this setting.
Vertical Sync: Vertical Synchronization (also called Vertical Sync, or simply VSync) is the synchronization of your graphics card and monitor's abilities to redraw the screen a number of times each second (measured in FPS or Hz). If VSync is disabled (set to No), you may see some image "tearing" as your monitor and graphics card go slightly out of synchronization when the refresh rate exceeds the monitor's abilities, however your FPS can now exceed your monitor's refresh rate. There is something important to understand when talking about VSync and Quake 4 though - the Quake 4 engine is specifically capped at 60FPS, so you cannot exceed this framerate regardless of your VSync setting (See com_fixedtic under the Advanced Tweaking section for more details). You can still have a refresh rate higher than 60Hz, it's just that your monitor will simply show some frames more than once. It is always recommended that you have as high a refresh rate as possible to ease eyestrain (See Advanced Tweaking section). Whether VSync should be on or off in Quake 4 is not set in stone - it differs by system. Enabling VSync can result in smoother performance and of course less visible tearing. However enabling VSync doesn't just cap your FPS, it also reduces average FPS. I recommend disabling VSync and then if you find the tearing to be too annoying, enable it. For details, see my Gamer's Graphics & Display Settings Guide.
Update: As of the 1.4.2 patch, the si_fps command can be used by server administrators to set a higher tick rate and hence have up to 90FPS on a server. However this is controlled by the server administrator, so check the server details before joining to see what tick rate it's been set to.
Antialiasing: Antialiasing is a method of smoothing the jaggedness of lines in 3D graphics. For more details again see my Gamer's Graphics & Display Settings Guide. This setting has up to five options depending on your graphics card's capabilities: Off, 2x, 4x, 8x and 16x. When set to Off, there is no additional Antialiasing used, unless you have forced Antialiasing enabled in your Graphics card's control panel. Antialiasing set to Off provides the fastest performance. When set to 2x Antialiasing, this uses your graphics card to smooth out jagged lines at the cost of some FPS. Higher levels of Antialiasing will reduce FPS even more, but smooth out jaggedness considerably, particularly for distant objects. Note that if you have any level of Antialiasing enabled in your graphics card control panel, they will override these settings. If you want to use Antialiasing in Quake 4 I recommend selecting 'Application Preference' in your graphics card's control panel and then setting the AA level in-game here. For most people however I recommend setting Antialiasing to Off since it is a major performance drain.
Multiple CPU/Core: This option enables Dual Core/HyperThreading optimizations to improve Quake 4 performance on systems which have such CPUs. If you have a Intel or AMD Dual/Multi Core CPU, or a Pentium4 with HyperThreading technology enabled, then set this to Yes, otherwise leave it at No. Note you must have the 1.2 Patch or higher for this setting to appear.
Once you're done with these options click 'Close Advanced Options' to go back into the main menu. You may have to restart Quake 4 for some of these settings to come into effect. You may also have to come back and check on these settings if you alter other settings, since Quake 4 can sometimes automatically reduce these to counter other changes you've made.
[Audio Settings]
Volume: This slider controls the game volume for both music and sound affects. Adjust according to your tastes. Has no performance impact. To independently reduce the music volume, see the s_musicVolume command under the Advanced Tweaking section.
[Advanced Audio Settings]
Sound System: This setting lets you choose the audio API (application programming interface) for playing back sound in Quake 4. The Default setting will work on all systems, but the OpenAL system can provide better performance and audio quality. Before setting this option to OpenAL, first you must make absolutely certain you have downloaded and installed the latest audio drivers for your sound device. See the TweakGuides Tweaking Companion for details on how to find out more about your system and how to update its drivers. Next, to find out if your sound device provides full support for OpenAL, go to your \Windows\System32 directory and look for the presence of an OpenAL32.dll file. If the file is there, you should enable OpenAL mode here, and you should experience excellent audio and minimal performance loss. If this file is not present, you can still enable OpenAL mode, however if you experience any problems, set this back to Default.
Sound Device: Select your audio device here. Usually if you have a specific sound card, it will be listed here for you to select. If the device isn't listed first make sure you've installed the latest drivers for the sound device. If it still fails to list, select 'Generic Hardware', and if you have any audio glitches select 'Generic Software'. If you just want the fastest performance and don't care about audio quality, select 'Generic Software', as the other modes may use additional system resources in return for better audio quality.
EAX Advanced HD: Most recent Creative Audigy sound cards, and the full Creative X-Fi range support Advanced HD. This audio standard adds a range of special effects to audio if enabled, at the cost of a slight reduction in performance. You must also have installed the latest Advanced HD drivers for your card which can be downloaded here.
Surround Speakers: If the game detects that you have a surround-sound capable speaker setup, this option can be set to Yes. The game determines your speaker setup based on what you have chosen under the Control Panel>Sound and Audio Devices>Speaker Settings>Advanced section in Windows. Make sure you have the correct speaker setup selected in Windows, as this also affects your audio quality and any audio problems you may experience. If you are unsure of the best speaker settings to precisely match your setup, select 'Desktop Stereo Speakers' in the Control Panel (even for Headphones this proves to be a good choice). Selecting Surround Speaker mode can reduce performance slightly due to extra processing requirements, and may also cause some audio glitching on certain systems. Note, if you can't see this option here it is because the system hasn't detected a surround-capable speaker setup. You can force this setting to appear by setting the 'Sound System' setting to Default. For more details on how to adjust several other important audio settings in more detail see the Advanced Tweaking section.
Once you're done, click the 'Close Advanced Audio' option. Note that certain changes may require you to close and restart Quake 4 before they come into effect. And once again, make sure to check through all your settings one more time after Quake 4 has relaunched, because often some settings will have changed without you having changed them.
The next section looks at advanced tweaking for Quake 4.


