
Fallout 3 Tweak Guide
[Page 7] In-Game Settings (Pt.3)
[View Distance]
The distance sliders affect the way various objects and characters fade into and out of view. The main impact of lowering these sliders is on your framerate and object pop-in rather than on stuttering. However note that in all cases, the fade-in/fade-out effect is variable; you typically have to move closer to something before it fades into view, whereas moving away from it seems to take a greater distance (usually about twice as far) before it finally vanishes out of view. Keep this in mind, since the screenshot comparisons below can't really demonstrate this effect.
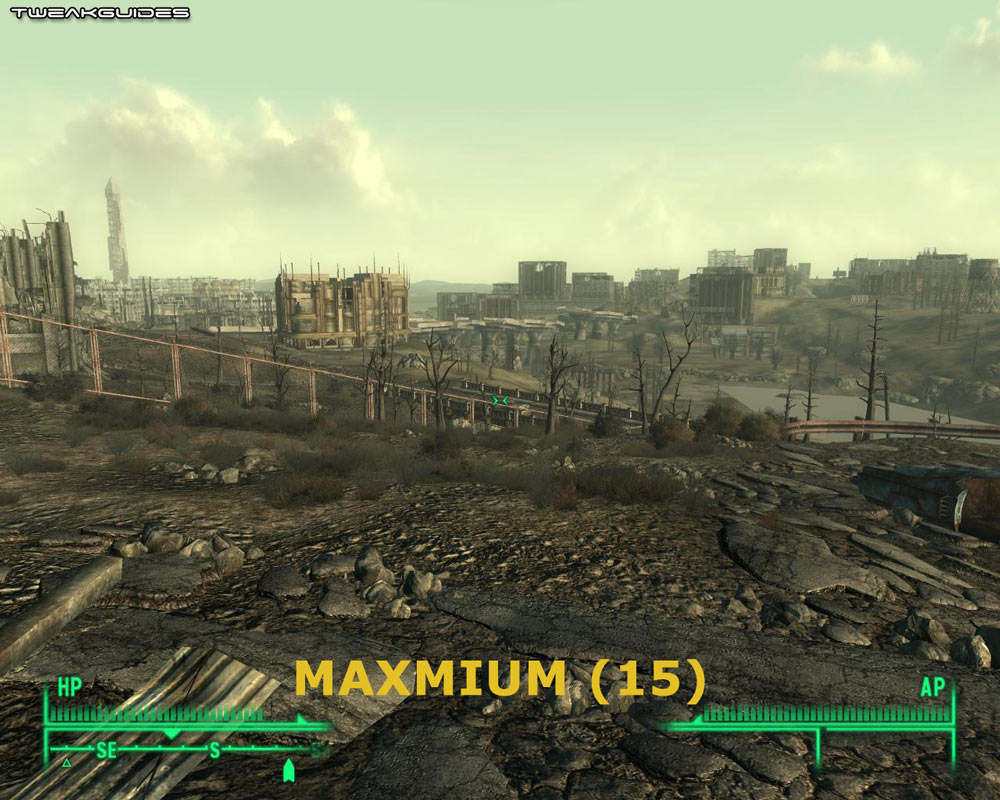

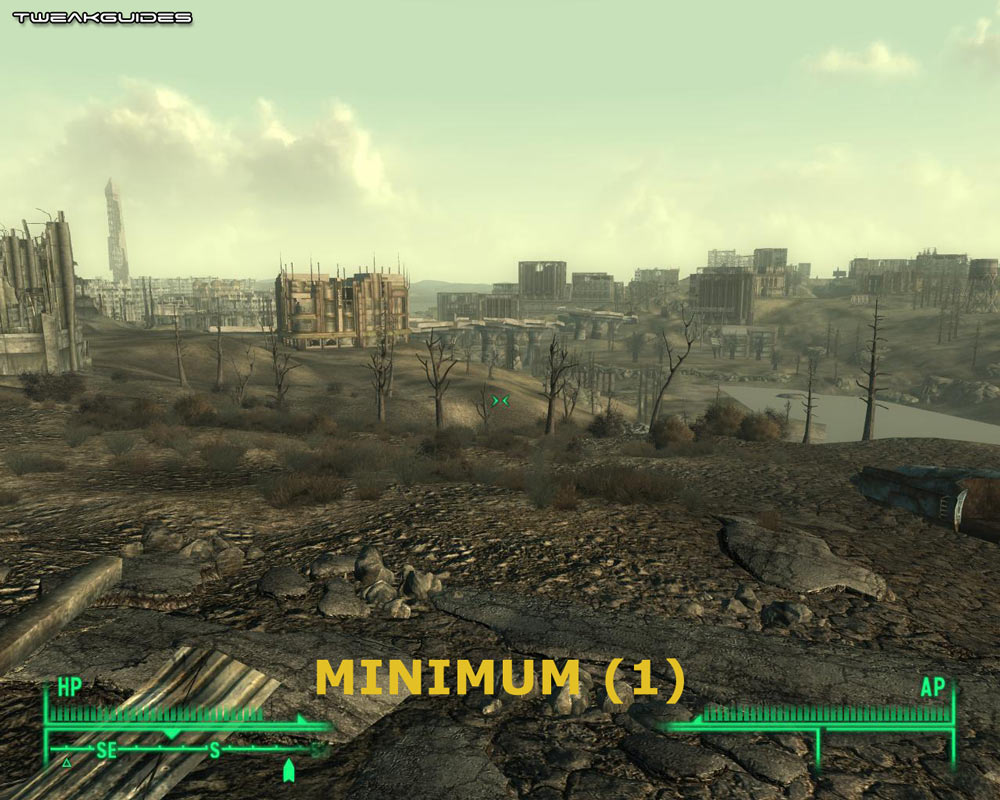
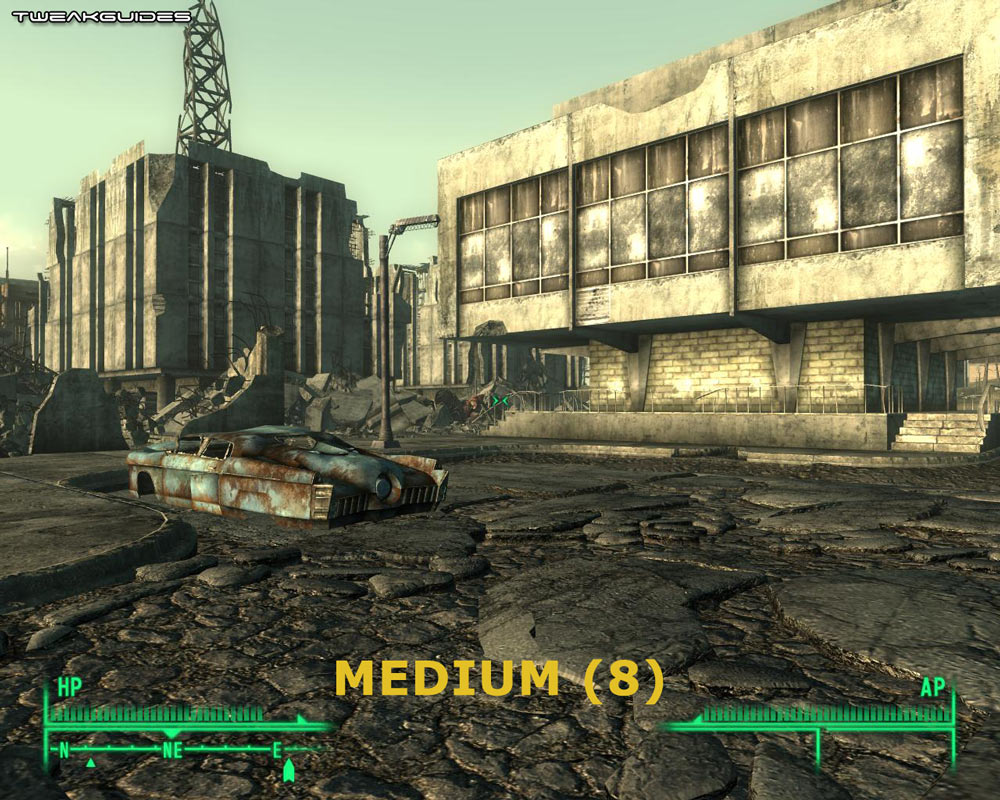
Object Fade: This slider controls the distance at which non-major objects such as fences, boxes, wrecked cars etc. are visible. As you move the slider to the left, many less important objects will be faded out of view. See the screenshot comparison above for an indication of the effects of this slider at its maximum (15), middle (8) and minimum (1) positions. As you can see, as the Object Fade distance drops to the mid-point, only a few minor items in the distance are removed. However by the time the slider reaches the far left, more prominent items such as the fence as well as various mounds of rubble and the guard rail to the right are all removed. While this will improve FPS, objects such as street lamps, cars, rubble, railings, fences and so forth suddenly popping into view just as you come to a few feet away from them while wandering the game world will really detract from immersion and reality, and will also annoy you, because an area which seems open from a distance might suddenly be completely blocked off by wreckage or a fence upon closer inspection. On balance I really don't recommend lowering this below the mid-point of the slider, if at all. It can be adjusted further using the fLODFadeOutMultObjects .ini variable in the Advanced Tweaking section.

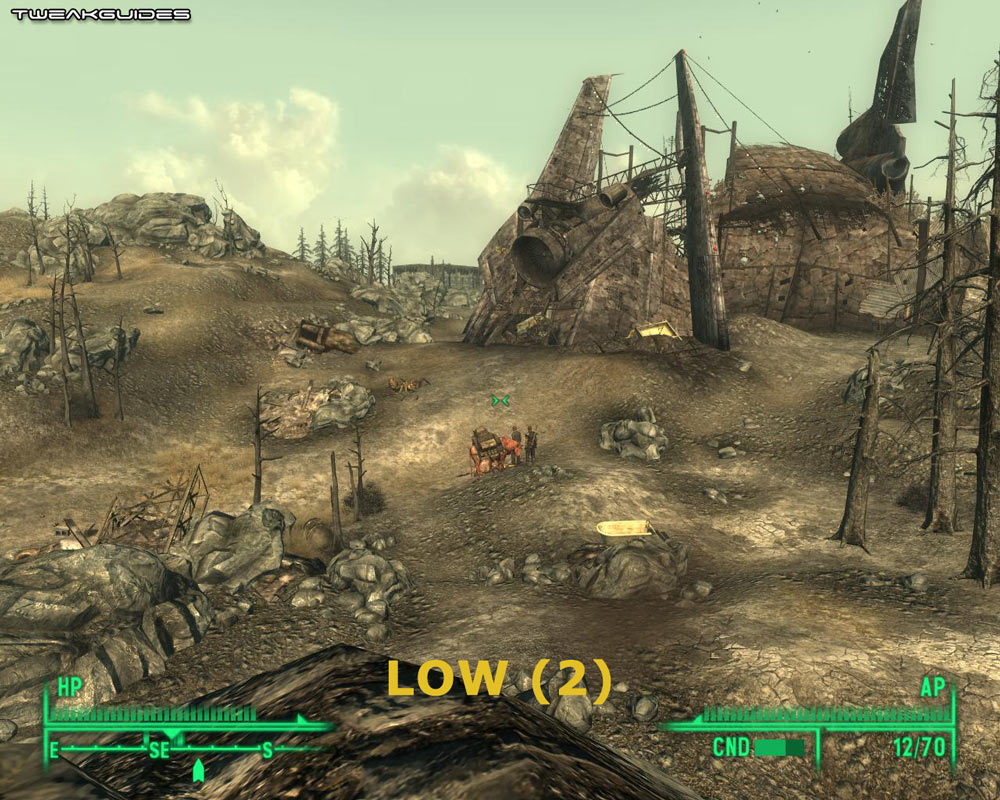
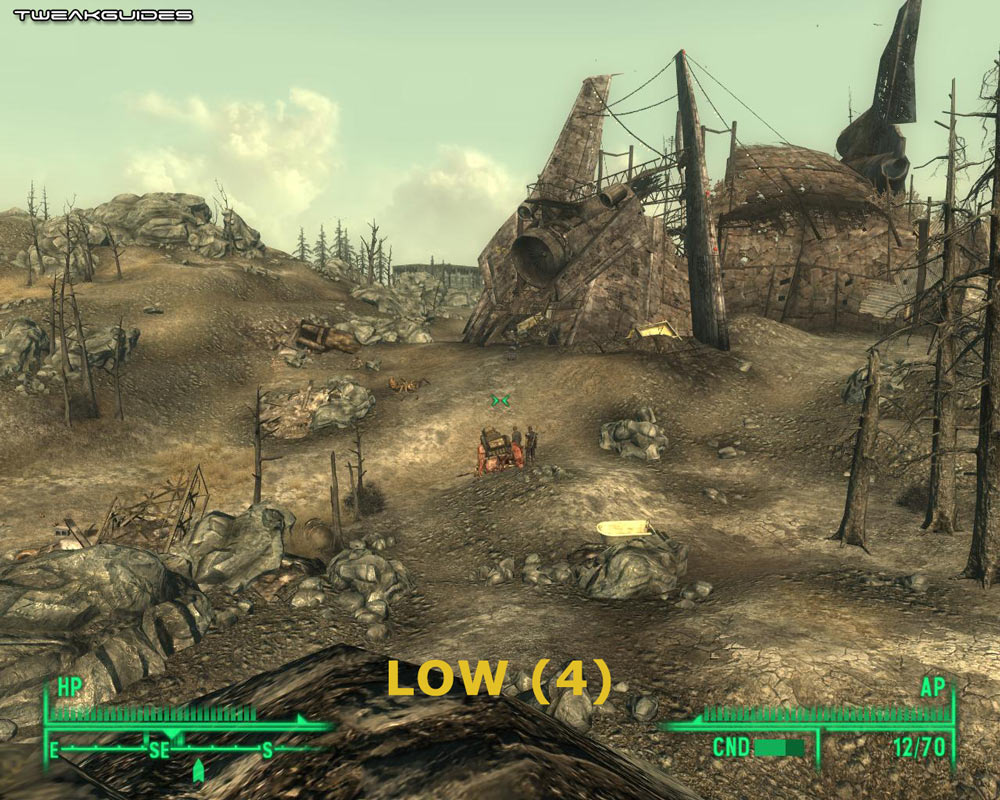
Actor Fade: This slider controls the distance at which other characters and creatures are visible. The screenshot comparison above shows that at the minimum value of 1, all NPCs except the dead ants are invisible; at a low value of 2 on the slider, the caravan in the middle of the screen (two people and a brahmin) becomes visible, and still at a relatively low value of 4, and at all values above, the Deputy Weld robot to the right, and Mickey the bum to the left are in view. Reducing this slider can boost FPS, however obviously if it removes characters from view then that also has gameplay disadvantages, because you may miss seeing enemies or friendlies even at moderate distances, so once again it is not recommended that this slider be lowered, certainly not below around halfway. The fLODFadeOutMultActors .ini variable can be used to further adjust this option beyond the slider limits - see the Advanced Tweaking section.
Grass Fade: This slider controls the distance at which grass fades in or out of view, however the effects are only really visible in large outdoor areas at longer distances, and even then it's still not particularly noticeable. The lower the setting, the less grass is visible. If you want to adjust this setting beyond that allowed by the Launcher options, and see a more visible difference, check the fGrassStartFadeDistance variable as covered in the Advanced Tweaking section.


Specularity Fade: This slider controls the level of specularity in the game world, which in other words is how shiny reflective surfaces appear to be. In practice the only obvious impact of changing this setting is that some metallic objects will lose their shine. The screenshot comparison above demonstrates that as the slider is lowered from far right (maximum) to midway to far left (minimum), the shine on the building to the right, the lampost in the mid distance, and the side of the blue car are gradually reduced or removed. Also note that oddly enough, if you select the 'Ultra' preset in the main Launcher menu page, that will set this option to a value of 20, which is beyond the limit of 15 allowed by the slider itself. However you can also manually adjust the value of this setting by editing the fSpecularLODStartFade .ini variable, and if you want to disable specularity altogether, either to further boost performance, or if you believe the game world is too shiny, then see the bDoSpecularPass variable covered in the Advanced Tweaking section.


Light Fade: This slider controls the distance at which light begins to fade out. Testing the setting outside I find it difficult to see a difference, but indoors, as the screenshot comparison above shows at the two extremes of minimum and maximum ends of the slider, the lamp on the right side casts less light when the slider is set to the far left than when it is at the far right. This can improve FPS slightly but it will make some scenes darker. It can be further adjusted using the fLightLODStartFade variable, covered in the Advanced Tweaking section.


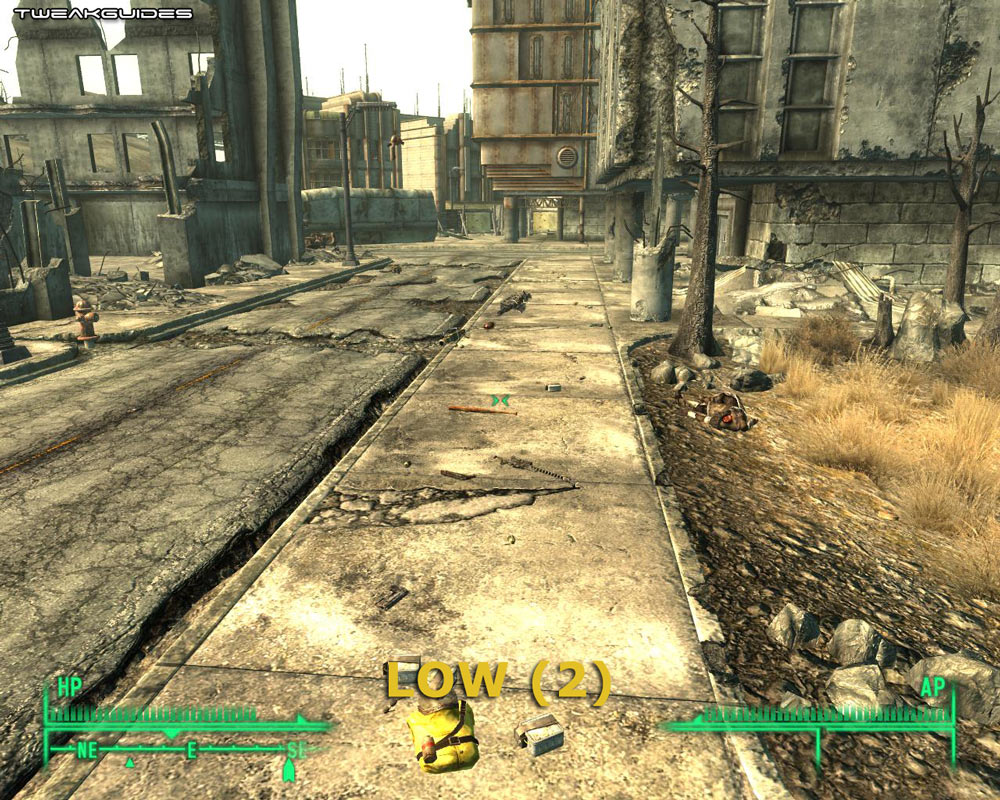
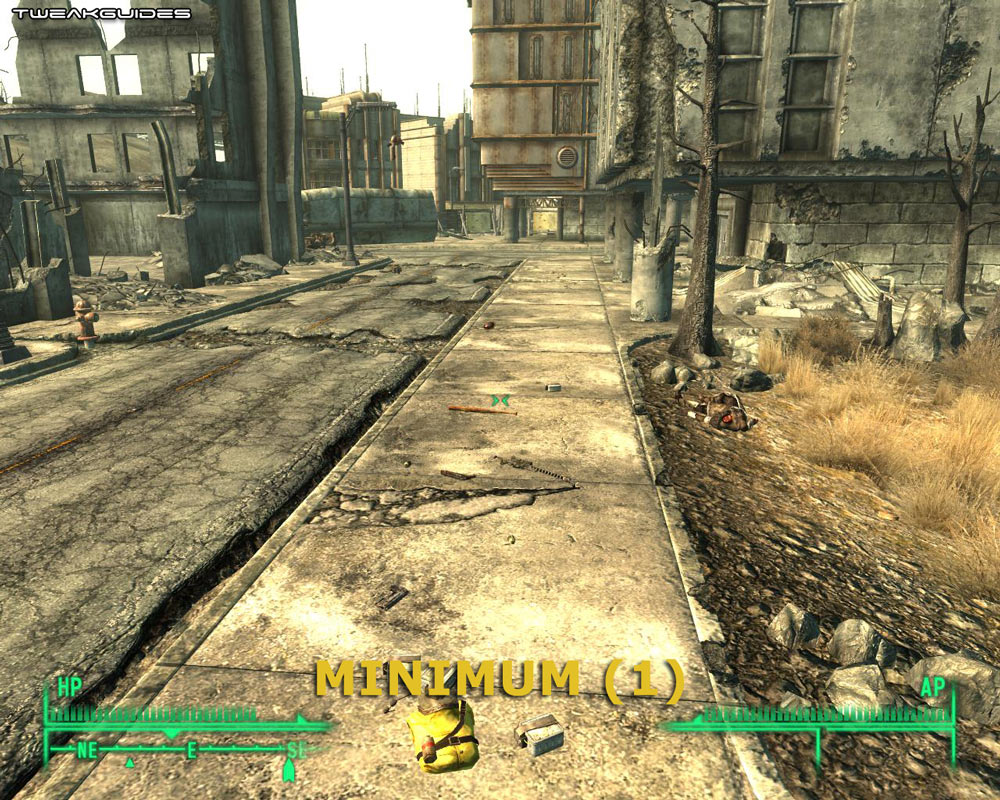
Item Fade: This slider controls the distance at which items such as guns, armor, mines, grenades, stimpacks etc. are visible. As you move the slider to the left, more distant items will no longer be visible - see the screenshot comparison above for an example, noting all the weapons and armor strewn along the sidewalk into the distance. In the screenshots it's only really when you take the slider to the far left, starting at a low position of 4 on the slider and moving downwards towards the minimum of 1 in single increments, that most visible items will start disappearing from the ground. While there is a relatively minor FPS boost from lowering this slider, in terms of gameplay disadvantage I strongly recommend against lowering this slider from its maximum, lest you miss seeing important objects, especially mines and booby traps, from a short distance away while wandering the game world. Remember that fade-in/fade-out is variable, so the screenshots above don't do justice to just how close you have to be to new items when you first approach them for them to fade into view. Can be further adjusted using the fLODFadeOutMultItems variable, see the Advanced Tweaking section.
Shadow Fade: This slider controls the distance at which shadows fade out. However because there are virtually no shadows aside from those cast by characters in Fallout 3, there is no noticeable performance or visual impact from lowering this slider. In fact even at the lowest level on the slider, and at the longest zoom possible for third person view, you will still see your own shadow cast on the ground for example. Use the fShadowLODStartFade .ini variable to further adjust this setting as detailed in the Advanced Tweaking section.
[Distant LOD]
LOD is short for 'Level of Detail', and all three of these sliders control the distance at which trees, terrain and major geometry can be seen. This can have an impact on stuttering, since the higher the LOD settings, the more details have to be loaded as you wander the game world, so if stuttering is a major issue for you, consider experimenting with these sliders. Note firstly that I strongly recommend changing the LOD settings in the Launcher rather the using the in-game settings of the same name, because otherwise you will not see their effects properly until you restart the game. Secondly, you may notice the grass position changes in the comparison screenshots - this is normal, the grass is generated each time a saved game is loaded, it never stays in the same location. See the descriptions below for what particular LOD aspects each setting affects.
Tree LOD Fade: This slider controls the distance at which trees can be seen. An animated screenshot comparison is provided to make the difference easier to spot - click this link: F3_TreeLOD.gif (926KB). As you can see, between the maximum setting (40) and the mid-point of the slider (20), the change is virtually unnoticeable. Between 20 and 10, there's a sudden loss of all trees in the mid to far distance; and by 0 some of the trees in the near distance are also removed. Reducing Tree LOD can improve FPS, but not in any significant way due to the relative lack of trees. It can however make the wasteland look even more lifeless, which may or may not suit your tastes. Note: if you want to increase the view distance for trees even further than allowed by this slider, use the fTreeLoadDistance variable as covered in the Advanced Tweaking section.
Object LOD Fade: This slider controls the distance at which objects large and small can be seen. Because the difference can be hard to spot in static screenshots, an animated comparison can be viewed by clicking this link: F3_ObjectLOD.gif (985KB). The comparison shows that from the maximum setting (50) to the mid-point (38), several unimportant buildings in far left distance and middle right are removed; from 38 to 30, three more generic buildings on the far right, middle and far left are removed; from 30 to the minimum setting (25), a whole range of generic ruined buildings are removed from the center of the screen. While lowering Object LOD can improve FPS, the improvement will not be major, and lowering this option may be of greater benefit to those looking to reduce stutter marginally. Note: you can use the fBlockLoadDistanceLow .ini variable to increase the view distance for buildings and objects even further than allowed here - see the Advanced Tweaking section.
Land Quality: This slider controls the appearance of terrain, however in experimenting with it I noticed virtually no change between the various levels here. Some extremely distant landscape changed shape a slight amount, and FPS also changed a fraction, but in reality the change was very minor. However the fSplitDistanceMult .ini variable controls this setting, and if it is raised to a very high level, the improvement in distant land quality becomes more noticeable; see the Advanced Tweaking section for details.
Display
Brightness: This gamma slider controls how bright or dark the overall screen image will be. Adjust it so that at night the image is visible but not washed out. It has no impact on performance, so set to suit your taste. If you need to increase gamma to be much brighter than the maximum on the slider allows (e.g. on very old monitors), see the fGamma-related variables in the Advanced Tweaking section.
HUD Opacity: This setting controls how transparent your Heads Up Display (HUD) elements are; namely the various indicators on your screen such as your compass on the bottom left. There's no significant performance impact from changing this setting, so set to suit your taste. If you want to remove the HUD altogether move the slider to the far left. Further HUD customization options are available in the Advanced Tweaking section.
HUD Color: This setting allows you to change the color of all the HUD elements. The default is Green, however you can change them to Blue, Amber, or White. Has no performance impact so set to suit your taste.
Pip-Boy Color: The Pip-Boy 3000 is the small computer you wear on your left arm and access using the TAB key by default. This setting allows you to change the color of the text and images in the Pip-Boy, from the default of Green, to Blue, Amber or White.
Note that you can directly edit your HUD and Pip-Boy interface colors using the uHUDColor and uPipboyColor variables as covered in the Advanced Tweaking section.
Texture Size: This is the same as the Texture Quality setting in the Fallout 3 Launcher, and is covered earlier in this section.
Fade Options: The various Fade and LOD-related options here are all exactly the same as the settings of the same name available in the Fallout 3 Launcher, and are covered earlier in this section.
Crosshair: If enabled, a small crosshair appears in the middle of the screen and provides color-coded hints as to the actions you can undertake with particular objects or characters. Enabling or disabling this option has no significant performance impact, however while it is more realistic with the crosshair disabled, it can also be very difficult to aim with some weapons as most don't have accurate iron sights. It's best that new players at least start out with the crosshair enabled until they have a better grasp of how to aim. Note that disabling this option doesn't remove the context-sensitive action prompts shown at the bottom of the screen (e.g. E) Search).
Dialog Subtitles: If enabled this option displays subtitled text for all words spoken by characters who you actually choose to start a conversation with. However anything they say outside of an actual direct conversation with you will not be subtitled. Neither this option, nor the one below affects other forms of subtitles or text prompts such as location text which appears at the top left of screen, or reply options during conversations. This setting has no performance impact so set to suit your tastes.
General Subtitles: This setting controls whether dialog subtitles appear outside of direct conversations. For example, when you pass by a talking character, their spoken words will be written as text at the bottom of the screen. However if you actually engage in a conversation with that character, this option will not show the conversation subtitles - the Dialog Subtitles setting above must be enabled for that to occur. This setting has no performance impact so set to suit your tastes.
Audio
Volume Sliders: There are six separate volume sliders here. The Master slider controls all sound volume in the game; the Music slider controls in-game (but not Menu) music volume; the Footsteps slider controls the level of footstep sounds in the game; the Voice slider affects how loud character voices are; the Effects slider controls special effects volume; and the Radio slider affects the volume of the Radio channels which you can access in your Pip-Boy 3000 under the Radio tab. Set these to suit your tastes, as they have no impact on game performance. Note that to adjust the main menu music volume independently, as it is not affected by the Music slider, you can either adjust the Master volume slider, or better yet, you can use the fMainMenuMusicVolume variable as covered in the Advanced Tweaking section. Note that setting the sliders to the far left does not provide a performance boost, because it does not actually disable music/sounds.
If you're experiencing audio-related glitches or problems, firstly make sure you have installed the latest audio drivers for your sound card. Appropriate links and details are in the Driver Installation/Windows Drivers chapter of the TweakGuides Tweaking Companion, along with further instructions in that chapter for correct driver installation and general driver tips. Note that for Creative SoundBlaster Audigy and X-Fi series sound card users under Windows Vista, Fallout 3 uses DirectSound audio, which means that it will require the ALchemy software for correct trouble-free hardware accelerated audio on your setup. Also try these instructions if you continue to have problems with audio after installing ALchemy.
Note that a temporary fix to the severely stuttering audio for the music in the Radio channels you can access in the Pip-Boy (e.g. Galaxy News Radio) is to press ESC into the main menu, wait a few moments, then continue with the game; alternatively, ESC into the menu and back into the game quickly several times. A more permanent fix is to install this particular DirectShow audio filter - copy the MADFilter.ax file into your \Windows\System32 directory, then open an Admin command prompt and type regsvr32 MADFilter.ax to install it. It may cause problems with playback of other multimedia such as videos, so if you want to uninstall it, use the regsvr32 -u MADFilter.ax command and then delete the file.
In general if you are having lots of stuttering, audio glitches and crashes which you suspect are due to audio-related issues, there are other tweaks you can undertake to adjust the audio system, although in practice I found that changing some of the audio-related variables can make the game unstable. The best possibility for resolving problems is to adjust the audio cache using the iAudioCacheSize and iMaxSizeForCachedSound variables, covered in the Advanced Tweaking section.
Controls
Mouse Sensitivity: This slider controls how sensitive the mouse is in the game. The further right the slider, the more sensitive your mouse will be to movements while playing. Note however that mouse lag - that is, the slowing down and general 'lagginess' of your mouse while playing the game is not as affected by this setting. Mouse lag is usually caused by low FPS in certain areas - use a free utility like Fraps to measure your framerate and any time your FPS dips below the mid-to-low 20s, you will likely experience increased mouse lag. You should consider reducing some of your settings to increase your framerate if that's the case. Another major cause of mouse lag is VSync - see the VSync setting earlier in this section for details of how you can disable it properly, as it will help reduce mouse lag. There is one more fix for mouse/control lag - see the 'Max Frames to Render Ahead' tweak at the end of this guide which may also help reduce it.
Invert Y: If set to Off, moving your mouse back makes your character look down, moving your mouse forward makes him look up. If set to On, the opposite happens. Has no impact on performance, so set to suit your taste.
Action Mapping: Clicking this option takes you to a screen where you can assign keys and buttons to various functions in the game. These should be set to suit your taste as they have no performance impact. Note that by default the control listing is for Keyboard; to see and alter the Mouse bindings you need to click the Device item at the bottom right of the screen.
The next section goes into the Advanced Tweaking possible in Fallout 3, of which there is plenty.
|
|