
Hardware Confusion 2009
[Page 5] My Choices (Pt.2)
Motherboard
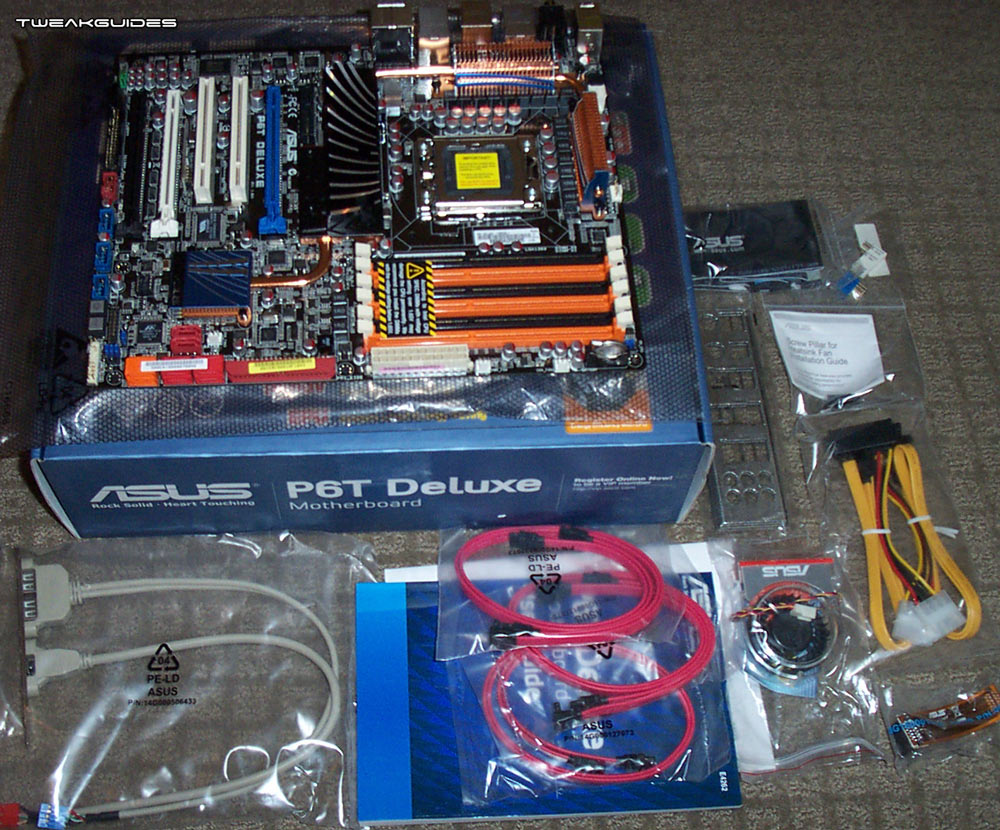
My Choice: ASUS P6T Deluxe (V1) Intel X58 Chipset
Choosing a Core i7 CPU automatically restricted me to a range of around twenty X58 motherboards which can support this new architecture. Upon closer inspection however, there are broadly five major motherboard choices for enthusiasts upgrading to Core i7: the ASUS P6T series; the Gigabyte EX58 series; the DFI LanParty series; the MSI Eclipse series; and the Intel DX58SO board. There are other brands of X58 boards steadily becoming available around the world, such as Foxconn, EVGA, BioStar and XFX, but I wanted to stick with the best-known motherboard manufacturers which have an established reputation for producing good quality boards.
Let me take a moment to relate a story of the time I chose a lesser-known brand of motherboard, based solely on its features and price. The board in question was the Shuttle AV40, one of the first Pentium 4 motherboards to support DDR RAM instead of RAMBUS RAM - a big deal back in 2001 when the P4 was released. Rather than buying overpriced RAMBUS memory, I could use this board paired with cheaper DDR and save money on both the motherboard and the RAM, while still getting good performance. And for a while, that's exactly what the motherboard delivered. However a few years later, after I had passed on the P4X266-based PC to my parents, it started acting very strangely. As I found out upon inspecting the motherboard closely, the capacitors were leaking badly, because poor quality components had been used by Shuttle rendering the motherboard completely useless over time. I made a mental note that in future I would stick to the major motherboard manufacturers who are known to use good quality components and have good design and layout, such as ASUS, DFI and Gigabyte.
In this instance, since the X58 is a high-end chipset and not aimed at the budget end of the market, it tends to carry higher quality standards along with its high price tag, so I wasn't quite as concerned about winding up with a board with bad capacitors for example. Instead I had to research the specific features each board offered, compare prices, and find out about any known limitations or quirks which could affect my proposed setup. From the very start I was drawn to the ASUS P6T Deluxe, a board both packed with features and at a price which lay at the lower end of the X58 board spectrum. I've owned two other ASUS motherboards in the past: the legendary P3V4X, and the P4G8X Deluxe. Both were great quality long-lasting boards and had all the features and BIOS options I wanted. Reviews like this one and this one indicated that the P6T Deluxe followed in a similar vein. It has a few features that aren't relevant to my needs, but given it's cheaper than some other X58 boards, that wasn't a major issue.
The cheaper P6T non-Deluxe version of this board was a close second in my thoughts. Although the P6T non-Deluxe has less features, it still has all the features I need. However it does have a lower spec power regulator design: 8+2 phase on the non-Deluxe vs. a 16+2 phase VRM on the Deluxe version. The VRM regulates voltages to the various components installed on the motherboard, so while an 8 phase design should be fine, a 16 phase is better, though probably not in any major sense unless overclocking heavily. The P6T Deluxe also seems to have slightly better cooling than the P6T, with additional heatpipes. Ultimately I opted to get the P6T Deluxe version because I value stability so highly, but it is possible that I wasted a bit of money doing so when the P6T non-Deluxe was sufficient.
Potential waste aside, the P6T Deluxe seems to be a good choice. Aside from quality solid Japanese-made capacitors, the P6T Deluxe uses only passive cooling in the form of heatsinks and heatpipes, which means no more chipset fan noises. On my previous DFI LanParty NForce4 SLI-DR I had to replace its chipset cooling fan after a while because it started making a rattling noise and wasn't cooling the motherboard properly. The replacement although much better eventually started making more noise during hot summer days. This ASUS board removes this problem altogether, and remember that noise is a higher priority for me in this build. Furthermore there are a lot of little touches which make the board much easier to assemble and use. For example the inclusion of 90 degree SATA cables allows you to connect your drives without their cabling jutting out at awkward angles. Overall the board design, layout and features are very well thought out.
The BIOS in particular is excellent, everything is very clear and all the options I want are present. The very first thing I wanted to do was to flash the BIOS to the latest version (1102). Given I had no floppy drive on my new machine, I was a bit worried as I didn't want to use the risky Windows flash method, but more importantly, I wanted my BIOS flashed and the settings finalized before installing Windows rather than afterwards, for reasons I'll explain shortly. As it turns out, within this BIOS there's an option to use the 'ASUS EZ Flash 2' utility, and fortunately you can even flash a new BIOS directly from CD if you wish. I did just that and the board updated to the latest BIOS without a hitch, proving in the process that a floppy drive is now pretty much redundant on modern PCs.
As noted above, one of the first things I do with a new motherboard is to set up and finalize the BIOS settings properly before installing Windows. This minimizes potential issues such as IRQ conflicts and unnecessary/incorrect driver installation. In the P6T Deluxe BIOS I quickly found and disabled all unnecessary options, set the SATA drives to AHCI Mode - a step definitely best done before OS installation, and which I discuss in more detail under the Drives component - and confirmed that all the connected hardware was correctly identified by the BIOS. At every step of the way I referred to the motherboard manual as it covers every BIOS setting reasonably well.
Now it should be noted that there are some people complaining about various issues with this motherboard, in the user reviews at Newegg as well as on the ASUS Forums for example. It's difficult to tell how much of it is due to user error and how much is actually due to faulty hardware. Call me cynical, but I suspected the former to be the more likely reason for many issues, and also noted that some issues related to functionality I will not be using, such as overclocking options, or SAS drives. To be safe, I made sure to check the official ASUS compatibility list found under the 'Qualified Vendor List' section of the Official P6T Deluxe Download page, and found that my RAM was 100% compatible with this board. Furthermore, I downloaded all the relevant drivers as well as the latest BIOS in advance, and burnt them to CD in preparation for Windows installation. As also noted, I then flashed the BIOS and made sure all the settings were optimally configured before doing anything else. A little preparation and research beforehand can prevent a range of simple mistakes and conflicts from occurring, and turn a potentially confusing and annoying process into a relatively straightforward one. I can't vouch for anyone else, but for me there have been no issues whatsoever with this board.
Finally, there's been some confusion recently over the fact that there are now two versions of the ASUS P6T Deluxe - the original 'Version 1' board which I purchased has now been superseded by a newly-released 'Version 2' model. Some Version 1 owners are angry, but it appears that Version 2 is simply the same board minus the SAS controllers; the rest of the specs remain identical. I do suspect that ASUS may have made some minor refinements to the board, and probably removed the SAS controllers as much because they may be the cause of some of the issues people have been experiencing as well as for cost reasons. So ideally if you don't run SAS drives and want to get a P6T Deluxe, I recommend making sure that you get the newer Version 2 just to help minimize the potential for problems.
Otherwise I can only report good things about this motherboard, it's been perfectly stable so far and is packed with features, so I'm very confident in the choice I made to base my system around the ASUS P6T Deluxe.
Power Supply
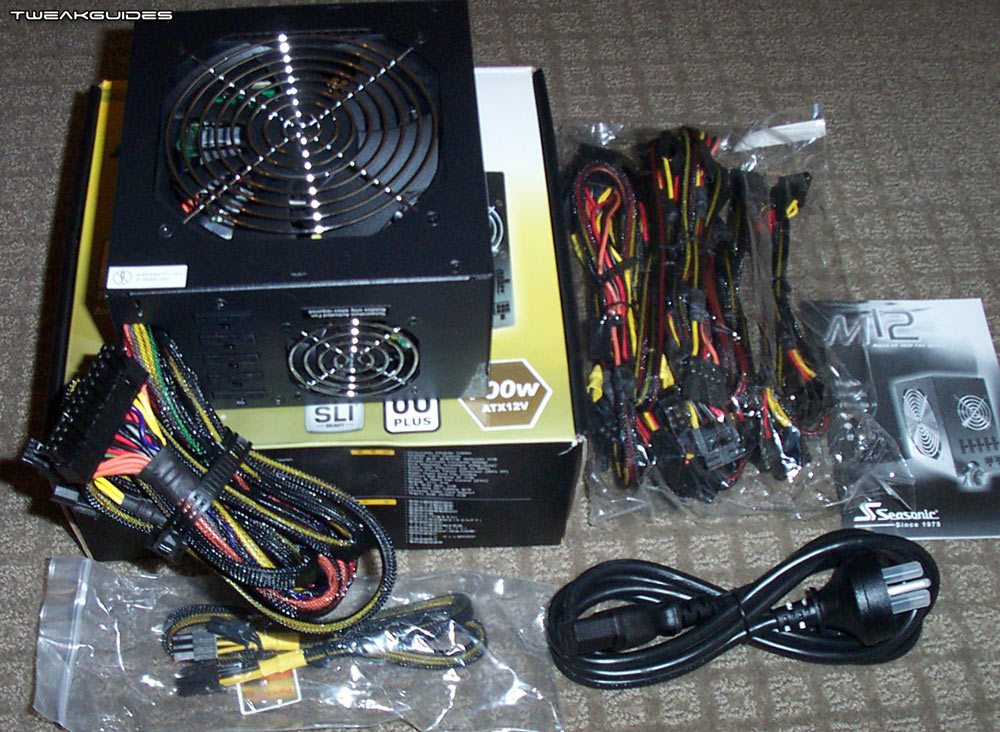
My Choice: Seasonic M12 700W Modular PSU
Ignored for many years, the power supply is starting to become recognized as a key element of a good PC build. Unfortunately for most people the wattage still appears to be the feature they pay the most attention to. In fact the pendulum has swung too far in the other direction in my opinion. A few years ago people were happy with generic underpowered 350W or 400W PSUs which really didn't do a very good job and could result in system instability; nowadays, enthusiasts seem to automatically gravitate towards the highest-priced high-wattage PSUs which can often be complete and utter overkill. Some balance needs to found, people need to know firstly how to calculate their actual requirements rather than taking a wild guess, and also be reminded that wattage is not the key decider of which PSU to get.
The driver behind the high wattage craze seems to be the proliferation of power-hungry high-end graphics card setups which are causing widespread confusion. When someone decides to buy a dual-GPU card like an Nvidia GTX 295 or ATI Radeon HD4870 X2 for example, or to put together an SLI or Crossfire setup, they quickly lose all perspective as to their actual power needs. In the absence of facts they assume sometimes astronomical power usage figures and buy a very high wattage PSU "just to be safe". While it's not unsafe to do this, it's certainly not the right way to do it either. The easiest way to work out a good estimate of your actual power requirements is by using this PSU Calculator. It's fairly straightforward to use, however note that there are some traps you can easily fall into which will result in overestimating your power usage. For example under the 'System Type' box, you should always select 'Single Socket' unless you actually have multiple CPU sockets on your motherboard. A Core i7 CPU for example has four cores, but it is still a single socket CPU; virtually no desktop system has more than one CPU socket on the motherboard, so pay careful attention to the descriptions while going through the calculator.
As an example, for the system I've just built, and assuming the more extreme case of 100% TDP on the CPU and 100% system load, with 20% Capacitor ageing, the PSU calculator gave me a total of 558W as the recommended PSU wattage:
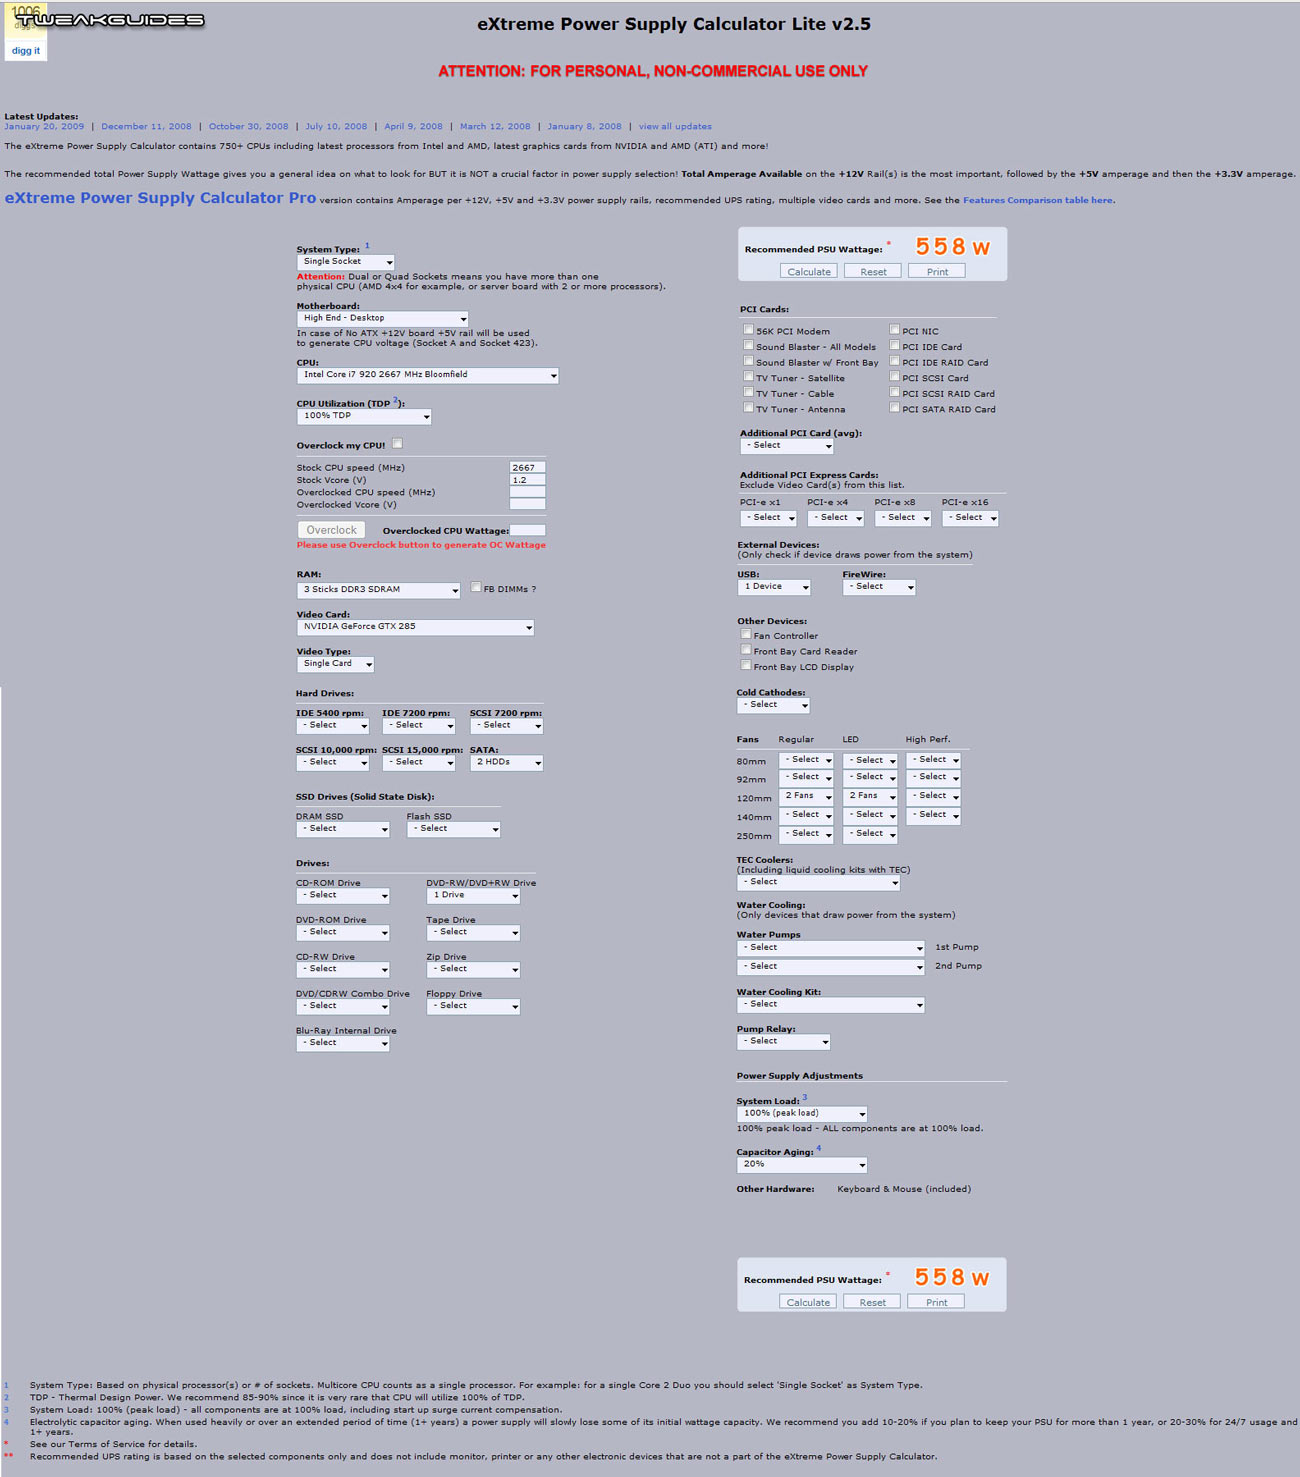
That figure is for the maximum possible watts that my entire system could draw from my PSU under extreme conditions. So in theory a good quality 600W PSU should be sufficient for this system, however a 650W or higher PSU will ensure that not only are my power requirements being met, but that there is also some headroom to prevent the PSU being pushed to maximum capacity and hence become hot and noisy under load. I allowed even more headroom and went with a quality 700W PSU. Given I'm not planning on any major additions to this system nor will I overclock it, the maximum calculated power draw from my system of 558W equates to approximately 79% of a 700W PSU's maximum wattage. Just to be sure, I also cross-checked my wattage requirements against the specifications for the GeForce GTX 285 I chose, and it explicitly states that the minimum system power requirement for the card is 550W. That's 550W for the entire system when combined with this card, by the way, not 550W for the card by itself. Thus with a maximum of around 558W power draw, opting for a 700W PSU puts me well and truly in the clear in terms of having sufficient wattage for my system with a fair bit of room to spare.
However choosing a PSU is more complex than just working out the correct wattage. You should also consider PSU efficiency and the total amps delivered on the +12V rail. Both of these figures should be readily available from the PSU's specifications. To start with, PSU efficiency doesn't represent how much of its power is usable - all good PSUs should provide up to their maximum rated wattage with stability if required. Furthermore, contrary to popular myth, whether a high or low wattage PSU, the PSU only provides the amount of power the system needs, so buying a larger PSU than you require won't result in extra power usage all by itself. PSU efficiency is the proportion of the power the PSU draws from your power socket that is relayed to your system. For example a PSU with 80% efficiency providing 400W of power to your system will actually draw 500W from the power socket on your wall while doing so. In practice efficiency will differ at different levels of load on different PSUs, and it's an important figure to look out for. Ideally you want 80% efficiency or higher at your expected load level on the PSU.
Amperage on the +12V rail is a key factor in system stability. For example if you look at the specifications of some graphics cards, they'll say that they require a current of a certain number of amps on the +12V rail (e.g. 40A on +12V for the GTX 285). You should refer to the specifications of the PSU to see if the +12V rail(s) provide that much amperage in total. Note that some PSUs may have multiple 12V rails - this is technically a safety requirement to prevent potential overload on a single 12V rail, but is not a necessity, and some even consider it undesirable. In practice as long as the amps and total wattage supplied along the 12V rail(s) are solid and sufficient for the job required, it shouldn't make a huge difference whether you have single or multiple 12V rails.
The problem is that beyond trying to take note of the more obvious factors above, an accurate review is required to tell you whether a PSU is genuinely good quality or not. As this article points out, specialized measurement instruments are necessary to determine this, not just measuring voltages with a multimeter. Hence most PSU reviews are actually inaccurate and effectively useless. Accurate PSU reviews can be found at sites like SilentPCReview and JonnyGuru, so start there if you want to know more about a particular PSU.
The reason I chose the Seasonic M12 700W PSU had to do with a range of factors. Firstly, based on my PSU Calculator results and future plans, I felt a 700W PSU was sufficient, and at less than 80% usage even under maximum load, would not be pushed near its limits by my system. Furthermore, as this review at Jonny Guru confirms, it's a high quality PSU, varying between 79-83% efficiency across all load levels, with virtually no ripple and providing up to 672W and 56A across its +12V rails. But what really clinched the deal for me were three additional factors in order of importance:
While a PSU is a very important component in any system, I suggest that you sit down and calculate what your system actually requires, otherwise a high wattage PSU can just be a waste of money. That money could be better spent on other components which actually have a tangible impact on performance, or even simply to buy a PSU with lower watts but with much better efficiency, lower noise, and better current on the 12V rail for example.
On the next page we continue our look at the various components.
|
|